Showing posts with label Techniques. Show all posts

Wednesday, 17 February 2016

You say pants but I say trousers

A few months ago The Much Belovéd arrived home with two new pairs of trousers both of them of the long unfinished hem variety.
"Would you be able to shorten these for me please?" he asked.
"Yes of course darling.  I would be delighted to help you with that."  I replied knowing full well that I have never pinned or hemmed expensive wool trousers before in my life.  The last time TMB got a tailor to do this for him I was less than complimentary about the outcome so let us just say that failure, on this occasion, would not be an option.

I have restitched the hems of my own trousers on the odd occasion when then have needed repair but I have never tackled the whole job from scratch and I knew I was going to need to top notch guidance on exactly what to do.

I turned to my copy of Roberto Cabrera and Patricia Flaherty Meyers, 'Classic Tailoring Techniques: A Construction Guide for Women's Wear', (New York 1984).  This may seem an odd choice as I was altering gent's trousers but at the time I wanted to buy Cabrera's book the Menswear version was rather hard and or expensive to track down.  It was republished towards the middle of last year so I now have a copy of both.  The instructions are concise but clear and equally applicable to trousers worn by men or women.


I had TMB try the trousers on with a pair of shoes and pinned up the legs so that the hem reached roughy the middle of the back of his shoe and broke gently on the instep at the front.  Cabrera and I both agree that this is the right length for trousers some modern retailers disagree and favour the concertina look!  I got him to walk around a bit, look in the mirror and try sitting down to get his approval on the length before he took the trousers off again.

The next step was to mark the fold of the hem on the right side using chalk.  Wow! Chalk really works much better on wool flannel than it does on cotton poplin.  The amount left was obviously far too much to turn under as a hem I would have to cut some of the fabric away.


So I chalked another line about two inches below...


Took a deep breath and chopped.  I was VERY nervous about cutting into these but needs must.  I didn't really like the way that my nice clean cut edge began to fray so quickly.  Maybe I should have used the pinking shears but I hadn't so there you go.  I used the scraps to trial a machine zigzag to finish the raw edge but I didn't like the outcome.


I opted instead for something decidedly more old school.  Over casting the edge by hand.  This is a technique I had seen in an online reproduction of a very old leaflet on seam finishes.  It took a bit of time but it sewing by hand without a deadline is very therapeutic, especially when the daylight is good.


I turned the trouser leg inside out and pinned the hem back up along the chalked fold line.


And then tacked the the hem up keeping the stitches about an inch down from the top of the hem.  A really great tip is to insert a piece of cardboard into the trouser leg to stop yourself from tacking one side of the leg right through to the other.  I used part of a cereal box.


Then I turned the trousers right side out again and steam pressed the hem flat - nice!


Then I stitched the hems by hand trying to keep my stitches small enough to be invisible and loose enough not to pucker.  The result was perhaps not the work of a master tailor but I was satisfied and even better than that so was the prospective wearer.  On balance I really enjoyed the challenge.  Working with wool was a nice change and I am sore tempted to set to and sew myself a pair of tailored trousers sometime during 2016.


Tuesday, 10 February 2015

Welsh quilt inspired sampler

I think it is nice, sometimes, to not really know where I am going until I get there.  That is how it was with this piece of work.  I cannot bring myself to refer to it as a project as that might imply that I had some sort of plan.  At some point I had been loaned a Kaffe Fasset book that included a quilt top pieced from a variety of striped shirtings in four triangle squares.


Well I messed about with some triangles and came up with some less than delightful squares one of which just about looked like it might be a distant relative of something from a Kaffe Fasset quilt (see above top left corner.  This was where direction changed both literally and notionally.  The nasty squares became the back of a tiny sampler for some quilting


I had been reading about the wonderful quilts produced in Wales between the first and second world wars.  What really fascinated me about these was reading how quilts were marked out by professionals who sometimes stamped the designs onto whole cloth quilt tops which would be sold and sometimes they were marked out by drawing around ordinary house hold objects like tea cups, plates and irons.  I was rather captivated by the idea but doubtful that I would find myself marking out and hand quilting a double sized bedspread.  Instead I made up a small quilt sandwich and grabbed a tea plate and pencil.  I marked out this simple motif of circles leaves and chevrons.

Traditionally this type of quilting would be done by hand but I quilted this sampler on my Singer 15K hand crank machine making up the infill as I went along.  It's a bit wonky here and there but I find the slightly naive effect pleasing.  I ended up thinking of the technique as a sort of straight-line-semi-free-motion quilting.  I doubt it will catch on but I felt I had spent enough time on this to add a binding.  I did a bit of hand ladder stitching on the binding - way too tight just look at all those puckers!  I've hung this little oddity, from one corner, on a nail that was in the wall of the sewing room.  I don't think anyone really knows what to make of it but yellow and white always makes me think of fried egg and somehow my interest in and appetite for Welsh and Durham whole cloth quilts has been whetted.


Sunday, 30 November 2014

An apron with a gathered ruffle

Dear readers and follows I am sorry not to have written sooner.  I really don't know where the time has gone.  More responsibility at work plus regular weekend working, a new home with, for the first time, a garden?  Big changes seem to have left little time for blogging and sewing during 2014.  The choice: sew or blog so I sewed and left the blog in free fall.  Similar to not getting in touch with a friend or relative the longer you leave it the harder it gets.  Time for an update?  Past time!

The pattern for this apron came from the Liberty Book of Home Sewing.  My version, pictured below, was one of the first things I made on the Singer 401G - months before I wrote my first blog entry.  It's modelled beautifully by my gorgeous and glamorous sister.  The apron was a birthday present for her.


 I really enjoyed putting this project together.  It was one of the first things I shopped for specific fabric for.  It's made of Liberty Tana Lawn in the Carline and Glenjade patterns.  It really is lovely stuff to work with as I am sure many of you will know.  The pattern requires only two pieces which I drew on squared paper following the instructions from the book.  The waistband, ties and frill are all straight cut across the width of the fabric using a rotary cutter.

The apron was fun to make and allowed me to develop a couple of new to me, at the time, skills

  1. Patch pockets
  2. Gathering
  3. Bagging a lining
I followed the book instructions for gathering the ruffle which involved hand sewing a running stitch the length of it.  This must have added quite a bit of time to the making.  I didn't know at the time that I could just have easily sewn a long machine stitch with a loose top tension in much less time and achieved the same effect.  Thank goodness I have read some more books since then.  The next step was marking both the apron and the ruffle with pins at different spacings and gathering the latter down to the same spacing as the former.  The result was pricking even gathers!

The one other thing I would have done differently in hind sight was to make sure I matched the bobbin thread to the apron lining when I attached the patch pocket.  I never thought - experience (or lack there of) once again.


Friday, 25 October 2013

Sewing on buttons with the Singer 401G

I had to do a little repair so I used the opportunity to get some photographs.
This procedure is so much fun and so quick it is over all too soon.  As usual preparation is key.  First fit an open, short-toed, button sewing foot to the presser bar.

Singer slant shank button sewing foot

Next raise the throat plate (which is, on the 401, the equivalent of dropping the feed dogs - trust Singer to be different!)

Raised throat plate

This is done by setting the throat plate positioning lever to the darn/embroider/button sewing symbol.


The stitch selector must be set at AL and the red lever at position 1.


With the work clamped down by the presser foot and the needle aligned with a hole on the left side of the button take one stitch (turning the balance wheel by hand) and stop with the needle just above the foot.


Then move the red lever to position 4 and take six zigzag stitches ending with the needle back on the left side.


Move the red lever back to position 1 and take three stitches to secure the button.  Remove the work from the machine and trim the loose threads.  It's that easy.  It takes seconds.  I kid you not!

Saturday, 19 October 2013

Simplicity 1960: French Back Boxer Shorts - Pt I

I have had this pink and blue striped cotton shirting for months.  I picked it up cheaply on eBay.  I washed it to preshrink it ages ago and then it took me ever so long to remember to take it with me to the shops so that I could buy matching thread.  I no longer trust my memory of colour to buy thread.  Unless it's black or white.  After the fabric was preshrunk I was left with just under two yards.


That's a slightly awkward yardage - not really enough for a shirt.  I decided that the only option would have to be boxers.  I had a bit of spare time on my hands so I elected to make one of the most complicated patterns for boxer shorts in the world: Simplicity 1960 ©1945.

I have made boxers from this pattern once or twice before, retracing and redrafting the pattern to allow for my ample girth ©2013.  I pressed the pattern pieces and fabric in the usual way prior to cutting out.  I cut out using the rotary cutter with the help of Ramses II and Venus who always like to get in on the act at this stage.


The first step is to make two pleats in the fronts of the boxers.  These are clearly marked on the pattern pieces and the stripes on the fabric certainly help.


I secured the pleats with pins.


Last Sunday we did some organising in the sewing room so now I can used the Singer 201K in it's No.41 cabinet.  It's the first time it has seen any treadle action since the arsenic green Negroni shirt back in June!  I've rather missed it.  It's now positioned to the right of a window so the light, by day, is good.  I set the stitch length to the longest tacking/basting stitch 6spi.


And sewed about ¼ inch from the top of the boxers to secure the pleats.


The next step is to secure the two fronts together at the crotch seam using a flat felled seam.  This is a little tricky as the seam allowance has a curved taper from ⅝ inch down to nothing.  Careful pressing and folding and a slow but steady foot on the treadle are a must.  Lightly marking the sewing line with a pencil doesn't hurt either.


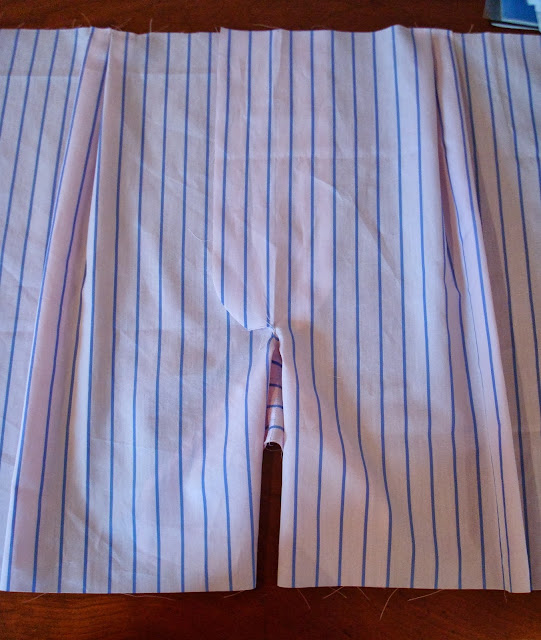
Here both fronts have been pleated and joined at the crotch.


Knife pleats

I then turned my attention to the seat panel and the questionable pleasure of creating a continuous lap.  The first time I made this pattern I actually had to look up what it was.  Thank goodness for the Internet-o-graph!


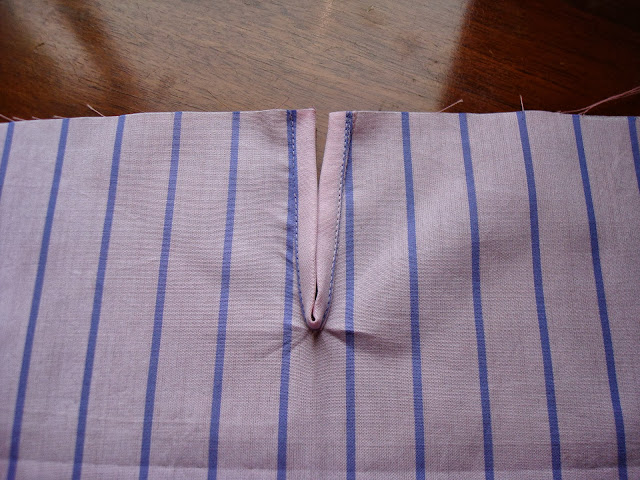
The first step is to stay stitch a V either side of the centre back.  The pattern has this V marked on it.  I marked it lightly on the fabric with a sharp pencil.


I then carefully slashed between the two lines of stay stitching - making sure not cut through the line of stitches.


And then (and this is the really silly bit) you have to open the V up until it as near a straight line as possible and pin a strip of fabric along the raw edge.


And then (the silly and HARD bit) stitch it - oh so carefully! - in place in such a way that the line of stay stitching will be enclosed.


Finally the raw edge of the strip is turned under and the fold top stitched to the right side of the seat panel.  This forms a sort of gusset.  I didn't find it easy.  It's well worth practising with scraps.  The pattern instructions call for a one inch strip for the binding.  Make it a generous inch.  I made mine nearer 1⅛ inch and was satisfied with the result.


After all that fuss sewing the seat panel to the fronts and joining the legs (all with flat felled seams) seams like child's play.

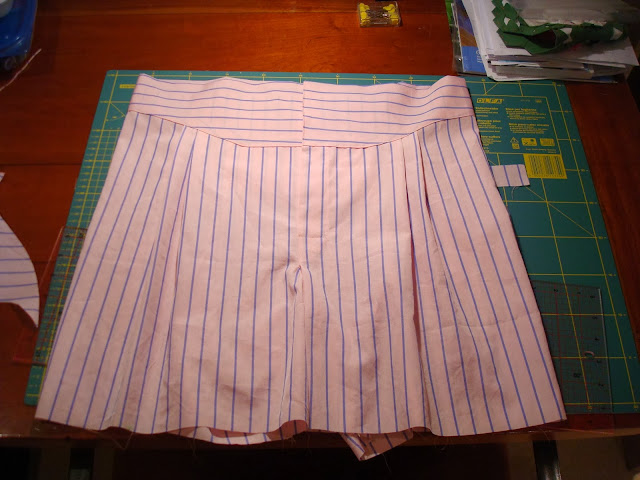
Here is where I ran out of steam.  The basic construction is complete with the two part yoke sewn to the wrong side of the shorts, folded over and then edge stitched to the right side.


Yoke front boxer shorts

The boxers still lack a hem, button holes, and buttons but they will have to wait for another day.  At the back the two piece yoke  combines with the continuous lap to form an adjustable waistband which negates the need for elastic.  How's that for austerity spec?!


French back boxer shorts

Sunday, 22 September 2013

Has anyone ever heard of a Hussif?

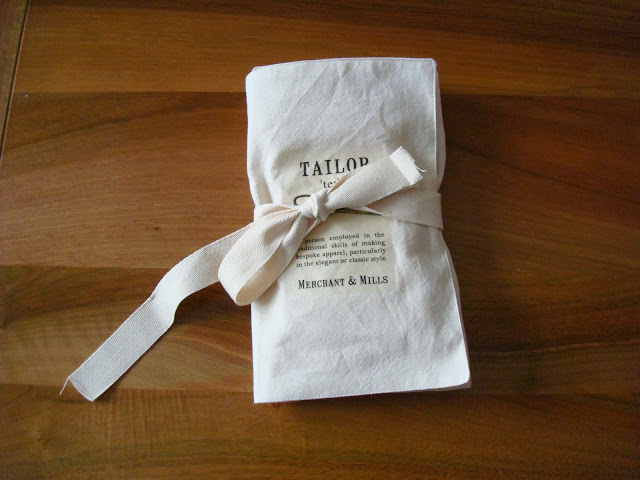
I hadn't until I was chatting to follower Ken a week or two ago.  I thought I knew what he was talking about until Monday when I treated myself to a copy of the Merchant & Mills SEWING BOOK.  When I saw a photograph of their project Hussif I realised the picture I had in my head was well off beam.  It turns out that a Hussif is a pocket sewing kit with some whimsical etymology thrown in for good measure.

I am rather taken by the Merchant & Mills SEWING BOOK.  It's an aesthetically pleasing object in its own right and the projects inside are, for the main part, non-gender-specific which makes a welcome change for the male seamster.

As a confirmed old bachelor with some heavy unbleached calico on his hands I figured that a Hussif is the nearest I am likely to get to a housewife and resolved to knock one up [perhaps I should rephrase that!?]

Here are some pictures of my version

Pocket Sewing Kit - open

There are seven pockets for bits and bobs sewing notions.  I made mine the same size as the instructions but the book encourages makers to adjust pocket sizes to fit the objects in their own sewing kit.  The striped ticking covers two layers of cotton quilt wadding which form a pin cushion cum needle case.

Pocket Sewing Kit - closed

Here is the Hussif all furled up and tied shut.  To give you an idea of size the cotton webbing tape is 25mm (yes I've gone metric today) or one inch wide.  I may trim the tape down a bit once things have stretched out a bit.

The first of two big adventures in making this project was printing the downloadable Merchant and Mills graphic onto what can only be described as magic paper and then transferring this to the front of the Hussif using the iron.


I think I may have overcooked the transfer slightly and the instructions on where to position it were not Gavin-proof (I may have got the graphic upside down) but overall I am pleased with the effect.  I am left with some mixed feelings about putting a company logo onto an item I have made but I like the look of the finished project and I have tried out something I never would have done otherwise.  My mind is now teaming with ideas for some kind of Oil & Thread transfer.  Possibly featuring a hen if I can find copyright free image to use.

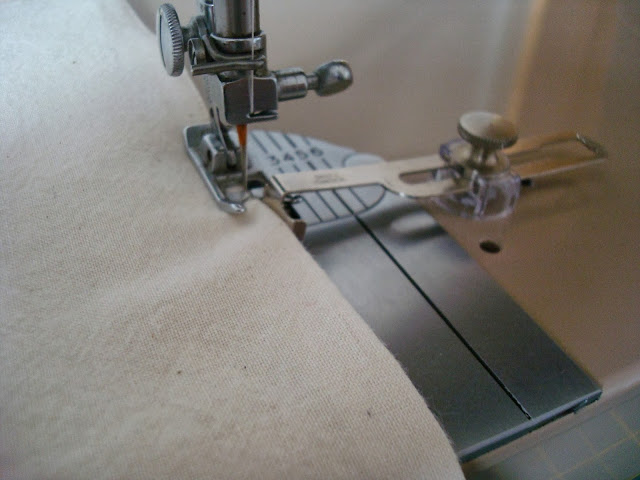
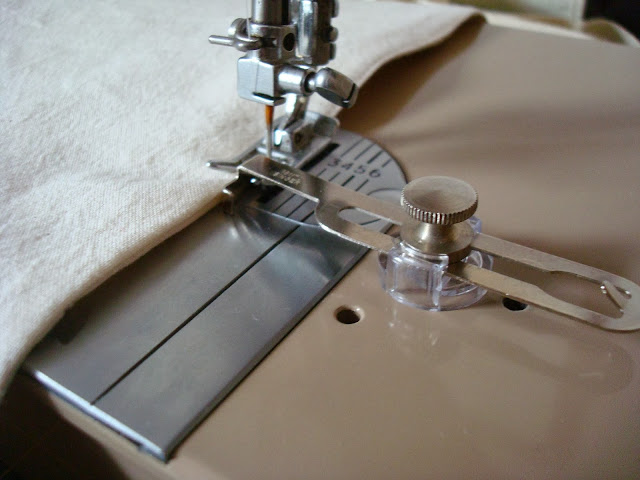
Adventure number two is a Singer 401G related discovery and one for the seam guide junkies amongst us (you know who you are).  I have discovered that the toe of the general purposes foot can be made to sit under the seam guide.  This is shown in the section of the Manual which shows how to blind stitch hems using the "BO" setting.  I realised that, with the needle centred (red lever at position 3), this gives scant ⅛ seam allowance.

Singer slant shank general purpose food and seam guide
Singer 401G: General purpose foot and seam guide

When would want a scant ⅛ seam allowance?  Well I found it handy when edge stitching the Hussif.  I hope you agree that the results are pretty tasty.


I am planning to hold on to this particular Hussif myself.  I have something in mind for it.  I really enjoyed putting this together.  It's a good way to spend a Saturday afternoon.  At this point in September I am thinking that one or two of these, filled with some 'heritage' style notions might make good Christmas presents.

Sunday, 18 August 2013

Seam Guidance or This one's for Matt C

Of all the sewing machine accessories I own (and they have rather mounted up here over the last year) the one I use the most is my seam guide.  This is probably because I use old black sewing machines with no markings on their throat plates.  To the best of my limited knowledge there are two basic types of seam guide.  The first is quite heavy, T-shaped, and pictured left.  This is the kind that tends to come with black japanned Singers with gold decals.  The second is made of lighter pressed metal and plastic and tends to be found with the later tan, pale green and duck egg coloured Singers.

Early type Singer seam guide
Later type Singer seam guide


Both types will screw into either hole in the machine bed of a black Singer sewing machine [say a Singer 66 for instance Matt]  I've taken pictures just to prove my point.  Notice that the later type can be swivelled about to allow for sewing curved seams.

If you have a zig-zag machine you can also use this type of seam guide to help with making a blind hem.  I haven't done it yet myself but this operation is on my experimental to-do list
Now this is not, as you might think, a six inch/15 cm ruler.  It is, in point of fact, a knitting and sewing gauge.  I know this because it has this written on one end of it.  This gadget, with its sliding marker, has a number of uses.  I use it a lot to set up the seam guides on my black Singers, none of which have markings on their throat plates.
Sewing and knitting guage

Now although these old Singer are not marked in the way that a modern machine would be there are landmarks if you know how to read them.  I've tried to illustrate the first here.  This is the front one of the two screws which actually hold the throat plate on to the bed of the machine.  Check out the seam gauge.  If you use the right edge of this screw as a reference point you'll be sewing a quarter inch seam allowance.  This is useful for those who piece quilt tops and other patchwork projects.


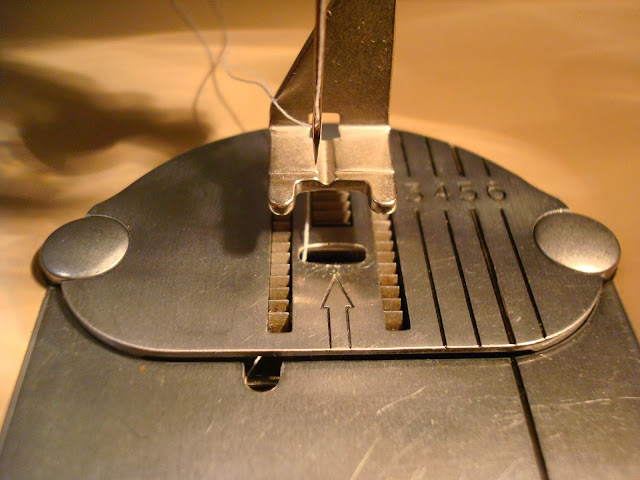
The next land mark is the mystery hole nestling snugly in the D-shaped throat plate.  Don't look for one of these if you have a VS machine like a Singer 28, 27, 128 or 127 because I don't think you will find one.  I'm not entirely sure what the intended purpose of this hole is.  I think it might be something to do with an under-braiding attachment sold by Singer.  The other interesting fact is that by using this hole as a seam guide you will be sewing a ⅝ seam which just so happens to be the industry standard for home sewing patterns.  Don't believe me?  Check the sewing gauge - handy eh?


Now, without the aid of the seam gauge, if you have the older type of seam guide and thumb screw you have two useful default settings.  The first I wrote about last time is for a ⅜ seam allowance and the second is achieved in the following way.  Set the thumb screw in the threaded hold nearest the throat plate and position the flat side of the seam guide as close to the thumb screw as possible.  This creates a spacing of one inch.  I suspect that this might well come in handy for turning hems.


Some people have seam guides and use them, some people have sewn beautifully for decades and have never seen a seam guide never mind used one.  They were a standard in the accessory boxes for Singer sewing machines so millions must have been stamped out over the years.  Bear this in mind if you are going to buy one.  I wouldn't want pay more than a couple of pounds for one.  It might be more cost effective to buy a job lot of accessories that include a seam guide - mixed lots turn up regularly on ebay.  If you can find one to buy cheaply or, even better, get one given to you you will have an easy to use accessory which will really earn its keep.


In parting I leave you with a link to one of Muv's (of Lizzie Leonard Vintage Sewing fame) excellent video tutorials.  If you're not familiar with her videos and blog check them out.  They are a priceless source for the care and use of vintage machines!  I cannot recommend them enough!