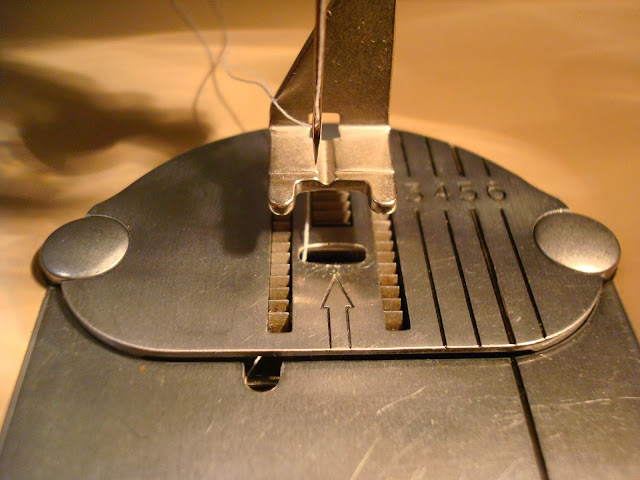
This procedure is so much fun and so quick it is over all too soon. As usual preparation is key. First fit an open, short-toed, button sewing foot to the presser bar.
Next raise the throat plate (which is, on the 401, the equivalent of dropping the feed dogs - trust Singer to be different!)
The stitch selector must be set at AL and the red lever at position 1.
With the work clamped down by the presser foot and the needle aligned with a hole on the left side of the button take one stitch (turning the balance wheel by hand) and stop with the needle just above the foot.
Then move the red lever to position 4 and take six zigzag stitches ending with the needle back on the left side.
Move the red lever back to position 1 and take three stitches to secure the button. Remove the work from the machine and trim the loose threads. It's that easy. It takes seconds. I kid you not!


That is so cool! I have a singer 403A that is similar to your machine. Do you use this machine for your everyday sewing or just for special projects?
ReplyDeleteMark P.
Hi Mark
DeleteThis is my only electric machine and the only zigzagger so I use it when I need to zig or zag ;0)
It is also great for straight line quilting when fitted with an even feed/walking foot. The 400 series of machine make good everyday sewing machines even though the newest examples are now pushing fifty. If I had to keep only one machine I suppose it would have to be this one in terms of practicality but I would find it hard to get by without the 201K treadle.
Look after your 403 and enjoy it. I hope you have plenty of fashion disks to use with it.
Hugs
G
Hello, this is a "tip" I learned years ago..Use scotch tape to hold your button in place while you are sewing it.. It is so much easier.. I learned the "Edna Bryte Bishop"
Deletemethod and she even instructed zipper placement by this method.. Base and press open the area where the zipper is to be placed. Tape the zipper on the wrong side and sew on the right side.. No pins and a very well inserted zipper...
Had no idea that the raising plate was the same as dropping feed dogs. I have recently added a very nice 401A. I have the slant foot and others from my long deceased touch and sew for button sewing. Now that you mention it I remember how much I liked the button sewing on the touch and sew though it was a lemon machine. If you put a slant needle button holer on this machine do you need the cover plate or do you raise it up ? I have one never used I found in a space age looking box-wondering if I should try to pick up one like the one you pictured instead-never used an attachment but plan to in the future.I presently take all buttonholes to my bernina 930 but probably should learn to do them one of the vintage machines here.
ReplyDeleteHi Mssewcrazy
DeleteCongratulations on your 401A. Lucky you kept your slant shank feet from your touch and sew they should all fit the 401A. I haven't tried the buttonholer without the cover plate because but boy have I been tempted?! I love those space age (Jetson) boxes. I plan a slant shank buttonholer post soon so keep checking back for more 400 series fun!
Hugs
G
You will need the cover plate. It will make the best buttonholes you have seen. Just "go around twice" for the best effect.
DeleteGavin I have the lemon touch n sew in a barn. I didn't want anyone to spend any more money on it perhaps getting it from the trash as I spent a small fortune having it timed over and over and it was always in various singer shops being fixed. I was beyond excited to find that this great singer model could use all the feet and monogrammers from the 1970s model. I never owned the button hole attachment when I got it as the touch n sew had a built in button hole that I used when it was not in the shop. I always liked using the walking foot as well. Definitely look forward to the button holer and other 401 posts and enjoy your projects.Actually any of the vintage machines as a post topic would be great as I have several models and a 127 treadle in the vintage machine herd. I showed my dh the vintage boxers you stitched-love seeing the old patterns come to life again. His are from the kwik sew 1672 (think that's the number) that I've sewed at least 12 pairs. Thankfully its instructions are good and I am getting faster at them. I'd be doomed as slow as I am if I had to do the vintage ones. They're a great project for the vintage buttonholer for sure with all the small buttonholes. I got the Jetson buttonholers at a resale shop that had the straight and the slant, one in pink and one in mint green clam shell cases for I think $10. I would really like to learn how to use these things. Computerized machine buttonholes can be good but not always so I'd like to learn to use an attachment.
ReplyDeleteI have a 401A, trying to sew buttons but it seems "4" is not very wide and the needle doesn't clear the right hand hole. Is my machine messed up? It was professionally serviced. It's set to "AL".
ReplyDelete