Showing posts with label Singer 15K80. Show all posts

Tuesday, 10 February 2015

Welsh quilt inspired sampler

I think it is nice, sometimes, to not really know where I am going until I get there.  That is how it was with this piece of work.  I cannot bring myself to refer to it as a project as that might imply that I had some sort of plan.  At some point I had been loaned a Kaffe Fasset book that included a quilt top pieced from a variety of striped shirtings in four triangle squares.


Well I messed about with some triangles and came up with some less than delightful squares one of which just about looked like it might be a distant relative of something from a Kaffe Fasset quilt (see above top left corner.  This was where direction changed both literally and notionally.  The nasty squares became the back of a tiny sampler for some quilting


I had been reading about the wonderful quilts produced in Wales between the first and second world wars.  What really fascinated me about these was reading how quilts were marked out by professionals who sometimes stamped the designs onto whole cloth quilt tops which would be sold and sometimes they were marked out by drawing around ordinary house hold objects like tea cups, plates and irons.  I was rather captivated by the idea but doubtful that I would find myself marking out and hand quilting a double sized bedspread.  Instead I made up a small quilt sandwich and grabbed a tea plate and pencil.  I marked out this simple motif of circles leaves and chevrons.

Traditionally this type of quilting would be done by hand but I quilted this sampler on my Singer 15K hand crank machine making up the infill as I went along.  It's a bit wonky here and there but I find the slightly naive effect pleasing.  I ended up thinking of the technique as a sort of straight-line-semi-free-motion quilting.  I doubt it will catch on but I felt I had spent enough time on this to add a binding.  I did a bit of hand ladder stitching on the binding - way too tight just look at all those puckers!  I've hung this little oddity, from one corner, on a nail that was in the wall of the sewing room.  I don't think anyone really knows what to make of it but yellow and white always makes me think of fried egg and somehow my interest in and appetite for Welsh and Durham whole cloth quilts has been whetted.


Tuesday, 2 December 2014

An apron and lots of bias binding (again)

Alright I promise that, during my sabbatical from blogging, I did sew something other than aprons but for the time being that is what I a bringing us all up to date on.  No more aprons for a while after today.  At least for a little while.

I have already blogged about Sewing Machine Basics by Jane Bolsover.   The pattern for this full length apron comes from that.  The pattern pieces for this and the other projects in the book are included on large sheets at the back of the book for you to trace off yourself.


The book is neatly arranged for the sewing novice.  Each chapter takes the form of a 'Workshop' which teaches the reader a new technique.  This is then followed by a project which makes use of the newly acquired skill.  The 'Bound-edged apron' project tests -guess what? - the use of binding and patch pockets.


I decided that the usefully sized pocket should not pattern match with main apron piece.  I did however try to centre the pattern piece on a motif so that over all the pocket ended up looking balanced.


I was very much in Singer 15K80 mode when I was making aprons during the late spring of 2014.  Hardly surprising I got a bit smitten with that machine once I got it sewing well.  Just look at those stitches!  I am rather proud of the triangles strengthening the corners.  Remember, after all, I was able to achieve those on a hand cranked machine which lacks a reverse feed - lots of needle down, presser foot up, action going on and I actually counted the stitches while I was sewing.


I am slightly less proud of the above nonsense.  The method of attaching the binding involved sewing through all layers at the same time - it looks a lot better from the right side.  This being me I was able to include, even on an apron with only two very simple pattern pieces, a flat felled seam, albeit a very short one at the nape of the neck.  There is no way I could "press open and finish seam allowance with a zig zag" given the machine I was using to sew this project - what's a boy to do?


I cut out the ties using a ruler and rotary cutter on the long grain of the fabric.  They are stitched along their long edge, turned through and then the open ends turned in and topstitched to the apron edges with a square and cross thingy.
  

All the raw edges are encased with home made bias binding.  Lots of measuring and fun!  Recognise the green fabric from the second apron with a ruffle?  I told you my stitching looked more even from the right side didn't I?


Here is the finished apron all ready to be sent off it's new owner - ignore all those work shirts that needed ironing!

Sunday, 30 November 2014

Another apron with a gathered ruffle

This ruffled apron is separated from the first by about eighteen months of time.  The first was such a hit with the ladies of the family that a second was needed to prevent a charge of favouritism on my part.  I was able to take more detailed pictures of the second apron before I gave it away to my Mam.


This apron is made of printed cotton poplin and lined with some plain white poly-cotton so that the raw edge of the ruffle is fully enclosed and the apron has a nice amount of heft, or body, or whatever you want to call it.


 The curved patch pocket is edge-stitched in place.  The side seams are angled slightly toward the top so that the pocket forms an open bag.


This being apron mkII I knew that I wanted to make sure to match the bobbin thread to the white lining fabric rather than to the green pocket.  Sewing with two different colours of thread is a dead giveaway for uneven tensions so full marks to the Singer 15K80 I sewed this with!


The ruffle is gathered at a ratio of 2:1.  When I first used this pattern I sewed the running stitch for the gathering by hand.  This time I was bold, I was brave, I was fearless and used a vintage Singer ruffler attachment.  I had to mess about with scraps a bit to get the fullness of the gathers as I wanted them.  I wasn't quite brave enough to use the ruffler to gather and sew the ruffle onto the apron in one operation as the old manuals suggest is possible - one step at a time!  I probably didn't save much time but using the ruffler was a lot of fun and the results are a pleasing firm even gather.


The instructions on finishing the ties are pretty nifty too.  The square ends are folded in on themselves at 45 degrees to produce neat points that are pressed and edge-stitched in place.


And one last close up of the hemmed edge of the ruffle in case any one is any doubt over how tasty the stitches produced by a 56 year old machine really are!


Thursday, 30 January 2014

Bonding with Singer 15K80

One day early last autumn I got out the Singer 15K80 to do a quick job sewing some furnishing weight chintz.  The cotton thread I used was pretty old, it came from a wooden spool that arrived with the machine, and thicker than the usual polyester I buy.  I really struggled to get the '15' to produce anything like the kind of stitched vintage Singers usually make.  The stitches were loose at the beginning of the seams then would improve - a bit.  The best I could do was to back the top tension right off to get the top and bottom threads balanced but then the overall impression that the stitches gave was somehow sloppy.  It was hard to distinguish neat individual stitches making up the line.  Hard to explain and I didn't take any pictures at the time.

The poor quality of these stitches in spite of many rethreadings and much adjustment of the top tension were rapidly making me fall out of love with this machine.  I have often thought of the 15 as a bit of an odd ball in the Singer stable with its odd man out bobbin and bobbin case.  Three of my machines take class 66 bobbins so why did I even need the hassle of yet another type of bobbin?  For a few minutes I even considered throwing in my lot with the 15k80 and selling it.

Instead I did some thinking and research and came to the conclusion that my problems were, more than likely, related to bottom tension.

It took me quite some time before I could find some really useful practical advice on how to set up from scratch a class 15 bobbin case.  One method I watched on You Tube relied on buying a new bobbin case set up at the factory and then pulling yards and yards of thread through the tension until you develop a 'feel' for what should be the right tension - er there must be a more scientific way than that…!

And of course there is.  A big thank you to Charles Day who submitted these instructions to singersewinginfo.co.uk helping people like me (and you?) to improve the performance of their vintage Singers.

Step 1: weigh out just under one and a half ounces of sugar


Step 2:  put the sugar inside a tiny ziplock back.  The one I used came with spare buttons for one of The Much Beloved's shirts and was just the right size.


Step 3:  Tie the bobbin thread to the bag of sugar.  My bag happened to have a small hole punched in it for just that job.


Step 4:  Load the bobbin into the bobbin case.  The first time I did this I discovered that the tension on this bobbin case was so light that the bag of sugar quickly dropped to the floor sending the bobbin spinning in its case.  Ah-Ha!  So there's the cause of my sloppy stitches and inconsistent tension.


Step 5:  Using the small screwdriver; little by little I tweaked up the tension until it was sufficient to just hold the bag swinging in mid air.  A sharp upward motion should allow one to two inches of thread to be pulled off the bobbin before it comes to rest in mid air again.


Step 6:  Load the bobbin and case into the machine; check the thread path of the top thread;  adjust top tension to balance the top and bottom threads; admire the beautiful even straight stitches produced by class 15 Singers.  I think I may have just found a new favourite.


Saturday, 15 June 2013

PJ Pants

Simplicity 0501 is a free download available here.  It's one of those patterns where you mess about printing it on 25 sheets of paper, match the sheets up, and stick them together with tape.


As this pattern only has two simple pattern pieces this is not too onerous a task but I don't think I'd be up for doing this with anything more complicated. Overlapping printer paper and tape make the pattern rather heavy but it all works.  I used shears to cut out.  I am not too good at curves with the rotary cutter.


The really great thing about this pattern are the lovely clear instructions. They really are written with the beginner in mind. I love the fact that they explain how to cut a double thickness of directional print by folding the fabric in half lengthways, cutting and then rotating one piece by 180 degrees - simple when you think about it right?


Those who have been following events here at Oil and Thread may remember that I wound a class 15 bobbin with navy thread ready for this project back in March! I remembered this and the as the Singer 15K was still out from making the tailor's ham the choice of machine for this project was automatic.


The first step, having cut out the fabric, is to make two button holes, near the waist, for the draw string. I usually like to make button holes with an automatic Singer buttonholer (the kind that takes a template) on my Singer 401G. This attachment (which is fab and I will show you someday) only fits Singer slant shank machines. I didn't want to drag out and set up another machine so I thought it better to try out this buttonholer, also made by Singer, which fits standard low shank sewing machines.

Singer 15 with button hole attachment
Add caption
As far as I know this model of buttonholer is more common in the UK and Australia.  It is the cream and red, face-lifted, version of the type where buttonhole length, width, bite and stitch length are all independantly adjustable.  This means that making sample buttonholes is a must!  It's a little scary but I work systematically. Get the lenth right first, then the width and the bite need to be adjusted in close conjunction with each other to produce an acceptable buttonhole. My aim, based on the pattern markings, was a half inch button hole that was wide enough for me to cut with my seam ripper and embroidery scissors.  It took me four goes to produce something I thought garment-worthy.

Button hole, bottom left passed the test!

I remembered to strengthen the button holes with interfacing saved from the cuffs of the white shirt I repurposed to make the log cabin quilt.  It's sew in rather than fusible.  I don't think that this will matter.


I am a happiest working with straight stitch machines and a real fan of flat felled and French seams so I deviated from the pattern instructions which suggested pinking and overcasting the seam allowances.  I sewed the inside leg seams, wrong sides together so that my flat felled seams would appear as a design detail on the outside of the garment.


This leaves the inside, which will be in contact with the wearer, as smooth and flush as possible.


The new tailors ham made pressing the seams so much easier.  I am a convert!

I am really happy with the way these have turned out.


Thursday, 14 March 2013

Liberty Print Boxer Shorts

After being cleaned and oiled I felt that the Singer 15K80 needed a work out so I ran these up.

Liberty Boxer Shorts

I picked the liberty print up at Fabric Galore in Battersea  months ago.  I had pre-washed, ironed and put it into the stash ages ago.  I had even been so organised as to buy thread and elastic at the same time.

The pattern I used is fairly simple.  It uses only two pattern pieces or rather the same pattern piece cut, flipped over and cut again.  I managed to cut out and nearly finish the boxers last night and hemmed them while the dinner was cooking this evening.  I have made this pattern once before (it was my first project when I started sewing after being given the 28K) so I had a fair idea of what I was doing.

From winding the bobbin with brownish red thread to finishing the hem the 'fifteen' performed faultlessly.  The old machine seemed to run more smoothly and more quietly with every stitch and it feels like it has some serious piercing power.  This fabric is probably 'dress weight' and as such maybe a shade heavy for boxers but two layers of it were as nothing to the 'fifteen'.  There is one point in this project where I was sewing through (I think) nine layers of cotton (it can happen) and the machine never missed a beat.

 As written the pattern suggests a zigzag and trim seam finish and even zigzagging the hem.  That isn't possible on a straight stitch machine so I did some thinking and adapted it for flat felled seams.  Neat and tidy for the inside of undies!

Flat Felled Seam

The elastic is encased in a tunnel waistband and the fly went together without too much bother.  It's not quite ready to wear but I am happy with the result and I'm sure it will be fairly robust.

Fly and Waistband inside view

At one and a quarter inches the hem is much deeper than any of my shop bought boxers but they hang well and both legs are the same length!


And I've now got plenty of scraps to turn into log cabin blocks!

Liberty Scraps


Saturday, 9 March 2013

Singer 15K80 Makeover

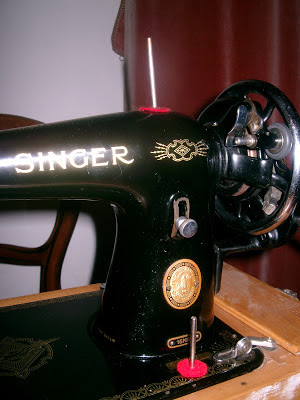
Remember the crooked makeshift spool pin the 15K80 had when it arrived?  If not see the photograph on the left for a reminder.  The picture on the right was taken after I fitted the proper Singer part.  Fitting turned out to be very easy.  The most important thing was making sure I got the correct hole.  I didn't want to end up blocking up an oiling point with the pin!  I couldn't find the rubber-faced mallet so I gently tapped the new pin home with a steel claw hammer.  Probably not to be recommended but I was very careful.  As well as being the right size and shape the spool pin is firmly fixed.  It's a small thing but I think it really improves the aesthetics of the machine.  The difference in reality is probably more marked than in my pictures.

Although I am not the number one fan of the blond wood base this machine currently resides in I am pleased with the way it has cleaned up.  I used fine grade steel wool and Black Bison wax.  This removed dirt, white marks (which might have been plaster of paris or poster paint. I have been told that this machine spent some of its life in a primary school) and even imparted a slight shine.  It has improved the appearance (and smell) of the base so much I am tempted to try the technique on the case that my 28K came in.  The 'coffin lid' is so dirty and dull I doubt that anything I do to it could make it  look worse.

Those of you who have been following the progress of the Singer 15K80 since it's arrival will remember that I had concerns over the authenticity of the hand crank fitted to it.  The decoration on the crank does not match that of the pulley guard and machine bed.  I also have issues with the fit of the lug/finger thingy on the crank between the spokes of the balance wheel.

  1. the lug/finger thingy seams too narrow for the space between the spokes of the hand wheel
  2. the lug/finger thingy is so long it fouls the bobbin winder when engaged.

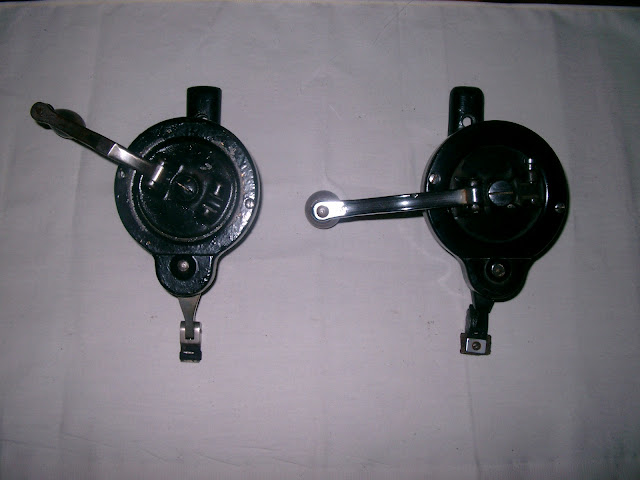
This pic shows the hand crank taken from my 15K80 on the left and another Singer crank I managed to get hold of on the right.  It came from a 1936 Singer 99K someone was "breaking for spares".  Spot the difference.  The one on the right has a shorter wider lug.  The one on the left is exactly the same as the crank on my 28K.

Not all Singer cranks are the same

In the next picture take a good look at the brackets which hold the cranks to the body of the machine.  The 28K type [on the left] is shorter than the later type [on the right]  . The combination of shorter lug and longer bracket on the newer hand crank explains why the crank that came with this machine was fouling the bobbin winder.


All back together again and happily winding a bobbin with new navy blue Guterman's.


The new crank
  1. is plain black so it doesn't clash with the decoration elsewhere on the machine
  2. is a much better fit in the spokes of the balance wheel which results in quieter running
  3. doesn't foul the bobbin winder when it is engaged 
I think it's time the 15K80 was put through its paces sewing up a real project.  PJ pants anyone?

Thursday, 7 March 2013

Goodies!

I like parcels.  Even if I have a fair idea of what they are going to contain.  Yesterday when I got home there was a red and white card on the mat telling me that the postman had something for me.  Hurrah!  I clattered around to the sorting office as fast as my brogues would carry me and came home with this.


The return address is a giveaway.  A parcel from Helen Howes can mean only one thing.  My sewing machine goodies have arrived.  My experience of Helen is that she is very good at getting things out to her customers in a hurry.


And she wraps things up very well too!  Can you tell what it is yet?


Some will know exactly what this is, what it's for and where it goes.  I didn't think I would ever actually get to see/own one.  These two little drawers are the tool boxes which would have been supplied with the Singer 401G 'portable' when new.  My 401 came with a few useful bits and bobs (not least the walking foot) but was missing the original tool box.  I have been adding to the 401G's kit as and when things have appeared.  The hearing aid beige plastic tool  drawers tone perfectly with the case that mine came in and it has a rather clever trick up its sleeve.  More of that to follow at a later date.  There's still more bubble wrap to get through today.


I just couldn't bear the idea of buying the tool drawers without something to put in it.  This is an adjustable slotted binder made to fit Singer slant shank machines.  It makes me want to run up an apron or a table runner.

There were more goodies in the parcel.  This time for the 15K80


New 15 class bobbins and a second hand spool pin of the correct pattern it's a perfect match for size and shape with the spool pin under the 15K80's bobbin winder.  Now I need to dig out the rubber-faced mallet.  It was last seen on a camping trip to Cornwall two summers ago and is probably stowed with the tent pegs.

Monday, 25 February 2013

Room for improvement?

Now that the Singer 15K80 is clean, lubricated and forming acceptable stitches my thoughts return to some of the things which make this machine feel a little odd to me.

The first is probably going to be the easiest to sort out.  Look at this:

Singer 15K80 spool pins, stitch length control, bobbin winder and balance wheel
Notice how slender and wonky the upper spool pin is?  I think that this is because it's not a spool pin at all!


A nail maybe?

The "spool pin" is loose and was easily lifted out of the top of the machine.  This is an impostor!  It's actually a pretty rough piece of steel standing in the place of a spool pin.  Oh well.  I guess it shouldn't be too difficult to pick up a genuine part like the nice stout straight one below the bobbin winder.  I think I will have to check out that well known on line auction site.

There's something else.  It's not so easily spotted and maybe something the machine and I will have to persevere with for the moment at least.  I will try and show you.

 
If you look closely at this overhead shot of the balance wheel and hand crank you may notice that the decals on the machine bed and pulley guard do not match those on the top of the hand crank.  In use it soon becomes apparent that the fit of crank in the spokes of the balance wheel isn't great either.  If anything it's rather loose.  I have the feeling that the crank is from an older machine a 27 maybe?

Well we all know that vintage machines get modified don't we?  So... I wonder did this machine start life as a hand crank and get separated from the original somehow?  Was this the result of conversion to an electric motor?  Perhaps this unit started life in a treadle?  Does anyone know if the answer to this mystery lies in serial number records?

When I first brought this machine home I had a vague idea that I might somehow use it for free-motion quilting.    There's a lot of chat on line about how great Singer 15s are at that kind of work.  I know that the 15K80 lacks dropping feed dogs but I have read that this isn't too much of a handicap if the stitch length is set to 0 stitches per inch.  However I would still need to loose the hand crank on this particular example or try growing a third arm!  I wonder if it would fit in the treadle cabinet that my 201K came in.