Showing posts with label My Life. Show all posts

Wednesday, 5 July 2017

Sewing Machine Surprise!

A warm, sunny, afternoon near the end of May I had just nipped out of the office to buy some milk and a sandwich.  Next to the supermarket in the village where I work there is a charity shop and I can never resist a quick look.  Out on the pavement was the unmistakeable shape, black japanning and gold decals of a vintage sewing machine.  I had to crouch down and have a little look.  All seemed to be there (always check for a shuttle and a couple of bobbins if you see a vibrating shuttle machine for sale) and not in bad condition.  Take a deep breath, consider the cupboard space to sewing machine ratio of one's domicile, exhale with relief because there is no visible price tag and walk away from the vintage sewing machine.  When I returned to the office I told the team all about the sweet little sewing machine I had seen and how very proud I was of myself for not buying it, for not even asking the price.

A few days later it was my birthday and, prior to my arrival at work, my colleagues placed a large parcel covered in floral furnishing fabric on my desk.  Under the cloth was the machine from the charity shop.  My boss had gone out that very afternoon and bought it.  She had hidden it at her home for about a week before surprising me with it!  She is, needless to say, a very good boss.  A brilliant birthday present because the machine needed the usual cleaning and tinkering with as a project so hours of fun before I even got sewing - the gift that keeps on giving right?

Jones Family Cylinder Shuttle Sewing Machine badged Victoria
Victoria Sewing Machine
The Victoria is obviously one of the many 'badged' variants of the Jones' Family Cylinder Shuttle sewing machine.  The story that wholesale machines were badged with whatever a retailer fancied is pretty well known.  The most common is probably 'Federation' for the Co-operative Wholesale Society and, my secret favourite, 'The Lee' for G H Lee of Liverpool.  There are a handful of Victorias pictured on the Internet, so they're obviously not that rare, but not much in the way of information about them.  I would love to know more about the Victoria brand and where they were sold if anyone out there has and information.


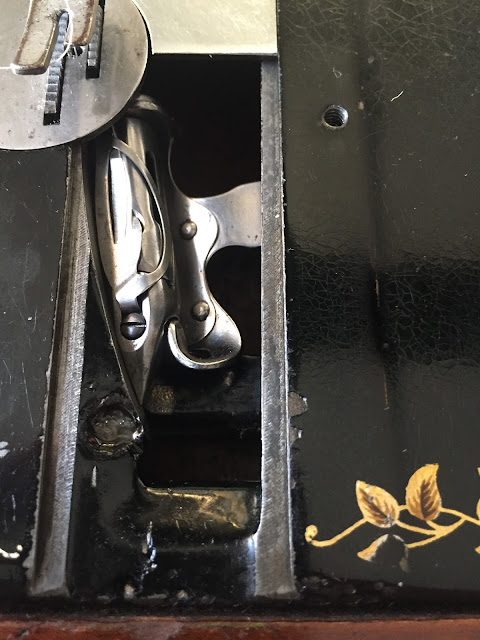
Plain polished face plate, note the thumb tab needed to manually release upper tension when removing work and the planned absence of a thread check spring on this model
Hand crank, spoked balance wheel, inspection plate in rear of the pillar.  The base is slotted for a treadle belt and has a lidded compartment for accessories.

Victoria badged Jones sewing machine: pivot screw
The large screw in the top of the machine's arm is a good indicator of Jones' manufacture.

Floral decal on the rear of the pillar

Detail of delightful decals

Just don't mention Kilbowie!

Bobbin winder with new pulley rubber from 'Sewing Down Memory Lane' fitted.  Serial number roughly dates this machine to the late nineteen-teens

Missing original rear shuttle race cover was replaced by one sourced from 'Sewing Down Memory Lane'

Jones Family CS sewing machine; detail of shuttle, shuttle race and shuttle carrier
It came with a worn-in, rather than worn-out shuttle which is marked 'Jones'

Well what can she do?  She can sew forwards only with a maximum stitch length of about eight stitches per inch right down to one tiny stitch on top of another.  Or, to put it another way, she'll do anything that Singer 28K can do.

12 SPI or 2.5mm should be good for general sewing and patchwork.  I feel a test project coming on!

Friday, 19 February 2016

Patchwork peg bag

After years of flat-dwelling, one of the nicest things about living in a house, with a garden, is the ability to dry clothes on a line.  The wonderful smell of freshly laundered sheets blown dry by a sunlit spring breeze!  But this means pegs.  We had the pegs laying around in the bottom of the clothes basket for a few months before I came across the perfect pattern for a peg bag in a magazine.

Here is my version.  The front is made up of four strips of scrappy patchwork which is pieced first to make panel which can be cut down to shape and size.

Patchwork peg bag front


The patchwork front panel is lined with a cream-coloured honey bee print cotton left over from another project.


I used an oh so simple straight stitch to finish the seam allowances together.


seam finish

The hook and crossbar are taken from a child's clothes hanger.  Usually hangers are curved.  This one happened to be straight but is easy enough to shape the top of the bag to suit whatever you have to hand.  A gap in the seam at the top centre of the bag allows the hook to protrude.  Very useful to hang the bag on the line leaving hands free for the washing.


The back is a single piece but could just as easily be patchwork if you had the inclination.  I rather love this cheerful little bag.

Peg Bag back

Sunday, 6 April 2014

It's curtains… for the sewing room

I moved house twice in 2013.  I have been lucky in that both of the dwellings allow for a designated sewing room.  Some of you will remember the first one from the blog entry last Summer.  The second has seen more service as a spare bedroom than for sewing.  I think this is because it is equipped with a futon rather than a decent cutting table.  It does however have a fantastic 1930s sideboard in which to store fabric, haberdashery and patterns and the room has enough floorspace for the Singer 201K in its cabinet.

The previous owners left behind a black-out roller blind and an empty curtain track so I thought I would have a go at curtains.

I was inspired, in part by one of my Christmas presents [am I really blogging about Christmas presents in April?] Sewing Machine Basics by Jane Bolsover...


… which contains instructions on how to make sheer curtains…


...and partly by a pair of poly chiffon curtains that came from one of The Much Belovéd's previous residences.  The curtains would not typically be my first choice of fabric but they were unlikely to be used again elsewhere, sheer and would therefore work well with the existing blind, free and available and therefore of no consequence should I happen to ruin them.


I laid a curtain out on the floor which was the only place big enough to do so.  The top of the curtain was finished with a tab top and the bottom partially finished with an overlocker.  I suppose the idea was to hem them yourself to the required length.  I rather suspect that this pair of curtains may have been supplied with their own packed of fusible webbing for just that purpose.

The tab top wasn't going to be much use to me because the type of curtain track I had inherited so the first thing to do was to get rid of it.  I set about it with my sharp shears.  The nasty plasticky label also disappeared along with the top hem.  Imagine putting a great heavy label like that on an item made of transparent fabric!


This operation left me with a long piece of cloth, hemmed on two sides, overlocked across the bottom width, with raw across the top.  Each curtain was more or less the width of my window and, from what I had read, using both would give me a nice fullness when gathered over the window.

The next step was to turn my attention to that overlocked bottom edge.  I decided to look upon that partial finishing as a gift on this slippery sliding shifting fabric and use it to help me produce my hem.
I began by turning up 1½ inches.  I turn the folded edge up again so that the line of overlocking was enclosed by my first fold.  This gave the bottom hem a triple thickness and a nice bit of heft which should help with the hang of the finished curtains.   I felt the need to use a great many pins to hold this turning in place.  The fabric handled something like a cross between a crisp packet and a bin liner.

The instructions in the book are to pin and then hand baste (tack) every bit of sewing you do.  I am sure that this approach produces fantastically neat results… … eventually.  A big apology to the purists but I just couldn't face that kind of investment of time in a piece of second hand polyester.  I managed to produce a decent hem using plenty of pins and the 1936 Singer 99K hand crank.  The machine handled a fabric which would not be invented until five years after it was built pretty well I thought.  I was sure to use a light tension to avoid puckering though.  I used a cool iron to press the hem because I was terrified the fabric might melt.  It just about holds a crease but not for very long.  More on how things went at the other end of the curtain next time!

Sunday, 29 September 2013

Baby Fence Rail Quilt - Pt VII: The Big Finish

The Baby Fence Rail Quilt is finished.  It's new owner came to collect it yesterday afternoon an hour or two after I had put the last stitches into the binding.  It was the first time Bill and I had met baby Georgia, who is just four weeks old, and we were captivated

Please excuse my ankles
I wasn't feeling game enough to do the quilting on the Singer 201K and defaulted to my 'go to' quilter the Singer 401K fitted with the walking foot.  I used the same putty-coloured thread to secure the layers as I had used to piece the quilt top.  It shows up better from the back.


The fence rail blocks finished at six inches and used the corners of these blocks are the reference point for the diagonal lines of quilting over the central part of the quilt.  In this way the lines of quilting are four and a quarter inches apart which should be a nice density for a baby quilt.  I quilted in the ditch around the inner border.


This picture shows how well Bill's choice for the backing fabric works.  I think it pops without clashing.  When I was binding the quilt I wanted to do this in exactly the same way I bound the Log Cabin quilt earlier in the year.  I had the blog to remind me but I hadn't been very detailed.  I couldn't for the life of me recall which machine I had used to sew the binding onto the front of the Log Cabin quilt.   So here is a note to myself for future reference:

  • For the fence rail quilt I used the 401G with the walking foot to sew the binding onto the front of the quilt
  • I left eight inch tails at the beginning and of the binding which really made it a lot easier to join them together later
  • I then used a size three between and a ladder stitch to sew the binding onto the back of the quilt using the line of machine stitching from the front as a guide for my hand sewing - yet again this took me hours but I still feel it's time well spent.  After all this is a gift for a very special little bundle.
A well-padded friend maybe just as cuddly as a quilt

Sunday, 11 August 2013

Did your granny wear one of these?


I don't recall my Gran wearing a traditional apron.  I remember her occasionally wearing a mauve overall (which has a nice consonance).  There is even photographic evidence of this garment somewhere at my mother's house.  Where I grew up butchers, joiners and freemasons wore aprons whereas Mams, Mothers, Grans and Grannies wore pinnies.  My own Mam had a rather fetching vinyl/oilcloth number with Superwoman (yes Super not Wonder) on it.

I am seldom certain of what motivates me but while I was on holiday I decided that, when I got home, I was going to make what I thought was called "a cross over pinny".  So I googled that phrase and was more or less thwarted by my NW UK English usage.  After further lateral searching I discovered that what I was really looking for was a pinafore.  This surprised me because I thought a pinafore was a dress. I was convinced of this because I remember my Mam sewing them for my sister.  She would ware a polo neck sweater underneath.  They were the girl equivalent of my dungarees.

I often discuss things with The Much Belovéd and this proposed project was no exception.  Now he grew up on the other side of the Atlantic, far away from our red brick man traps with their scrubbed steps, and when I told him what I had in mind he had some difficulty understanding me.  After further discussion we established that down his alley what I call a pinafore dress is a jumper, a UK pinafore is a US house dress, an English overall is a North American cover all and an apron is an apron.  Are we all singing from the same hymn sheet?  Great!


Thanks to actresses like Irene Handle...


 .........Kathy Staff... 

...and Jean Alexander this garment looms large in the psyche of one born in the late 1970s and weened on a diet of British television during the 1980s.

However this garment does not loom large in the psyche of internet search engines and sewing patterns, never mind free sewing patterns, for such garments are few and far between.

I did however manage to track down an inexpensive PDF explaining how to create your own pattern and construct a pinny from scraps. You can find it here if you are interested and if you are really interested you can tune in here soon to find out how I got on with it.

Saturday, 10 August 2013

All of the things that stopped me blogging

Hello readers!

What's that I hear?  Total silence?  There are probably none of you left as I haven't posted a word since I finished the Negroni shirt back in June.

Negroni shirt being worn on Cape Cod
So what has been happening since then?  Well I left my job, moved house, went on holiday, came back and started a new job.  So not much then really.

So the bad news is that I haven't had a lot of time to sew and therefore nothing much to blog and the good news is my new home has, or will have, a designated sewing space.

This muddle is my outstanding unpacking and the space will be the sewing room.


So the target for next week is to unpack, declutter, plan and arrange this room.  I still have an owl quilt to finish and that due date is getting closer and closer!