Showing posts with label Sewing Machines. Show all posts

Wednesday 5 July 2017

Sewing Machine Surprise!

A warm, sunny, afternoon near the end of May I had just nipped out of the office to buy some milk and a sandwich.  Next to the supermarket in the village where I work there is a charity shop and I can never resist a quick look.  Out on the pavement was the unmistakeable shape, black japanning and gold decals of a vintage sewing machine.  I had to crouch down and have a little look.  All seemed to be there (always check for a shuttle and a couple of bobbins if you see a vibrating shuttle machine for sale) and not in bad condition.  Take a deep breath, consider the cupboard space to sewing machine ratio of one's domicile, exhale with relief because there is no visible price tag and walk away from the vintage sewing machine.  When I returned to the office I told the team all about the sweet little sewing machine I had seen and how very proud I was of myself for not buying it, for not even asking the price.

A few days later it was my birthday and, prior to my arrival at work, my colleagues placed a large parcel covered in floral furnishing fabric on my desk.  Under the cloth was the machine from the charity shop.  My boss had gone out that very afternoon and bought it.  She had hidden it at her home for about a week before surprising me with it!  She is, needless to say, a very good boss.  A brilliant birthday present because the machine needed the usual cleaning and tinkering with as a project so hours of fun before I even got sewing - the gift that keeps on giving right?

Jones Family Cylinder Shuttle Sewing Machine badged Victoria
Victoria Sewing Machine
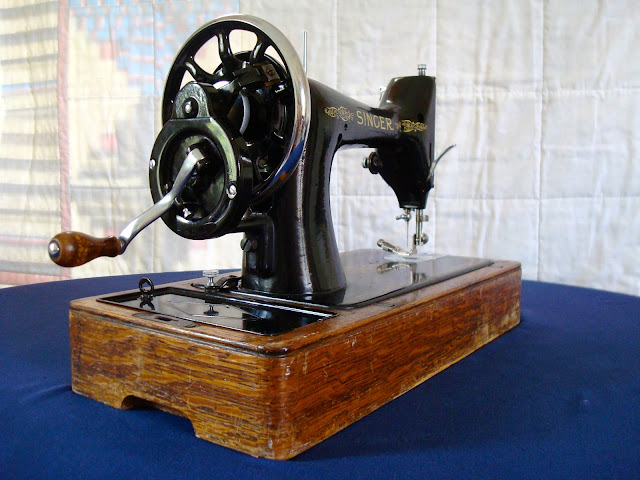
The Victoria is obviously one of the many 'badged' variants of the Jones' Family Cylinder Shuttle sewing machine.  The story that wholesale machines were badged with whatever a retailer fancied is pretty well known.  The most common is probably 'Federation' for the Co-operative Wholesale Society and, my secret favourite, 'The Lee' for G H Lee of Liverpool.  There are a handful of Victorias pictured on the Internet, so they're obviously not that rare, but not much in the way of information about them.  I would love to know more about the Victoria brand and where they were sold if anyone out there has and information.


Plain polished face plate, note the thumb tab needed to manually release upper tension when removing work and the planned absence of a thread check spring on this model
Hand crank, spoked balance wheel, inspection plate in rear of the pillar.  The base is slotted for a treadle belt and has a lidded compartment for accessories.

Victoria badged Jones sewing machine: pivot screw
The large screw in the top of the machine's arm is a good indicator of Jones' manufacture.

Floral decal on the rear of the pillar

Detail of delightful decals

Just don't mention Kilbowie!

Bobbin winder with new pulley rubber from 'Sewing Down Memory Lane' fitted.  Serial number roughly dates this machine to the late nineteen-teens

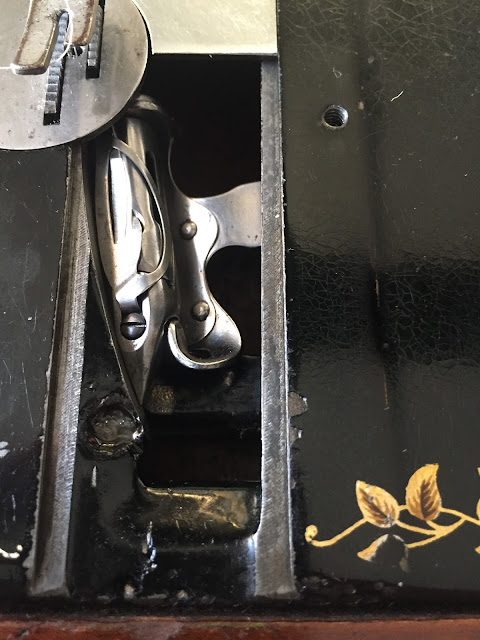
Missing original rear shuttle race cover was replaced by one sourced from 'Sewing Down Memory Lane'

Jones Family CS sewing machine; detail of shuttle, shuttle race and shuttle carrier
It came with a worn-in, rather than worn-out shuttle which is marked 'Jones'

Well what can she do?  She can sew forwards only with a maximum stitch length of about eight stitches per inch right down to one tiny stitch on top of another.  Or, to put it another way, she'll do anything that Singer 28K can do.

12 SPI or 2.5mm should be good for general sewing and patchwork.  I feel a test project coming on!

Tuesday 9 February 2016

Disappearing Nine Patch - Part I

I have decided to start my sewing year with a quilt.  I've spent quite a while thinking about what I want to do with fabrics I already have and in the time I have available.

I have been reading up about disappearing nine patch quilts here, here and here.  I was taken with the setting which imitates sashing and corner stones and decided that might work with the fabrics I have to hand at the moment.

Working from the premise that my individual squares would be cut at five inches based on the common size of commercially available charm packs I began to do some sums.

My quilt will be made up of nine nine patches that's 84 individual squares which would equate to two commercial charm packs at 42 squares each.  These will be made up of:

  • Nine red for centre of the nine patch blocks - these will become the corner stones
  • Thirty-six cream for the middle patches on each side of the blocks - these will become the sashing
  • Thirty-six coloured prints for the corner patches of each block - I cut six of each from six different fabrics


Here are all the squares cut out nice and tidy - a couple of hours work over a couple of evenings last week.  Speed is of the essence with this project as I don't have loads of time and I need to keep the momentum up.

The next step was to chain piece nine red squares to nine cream and then set aside nine cream for later.


I am working on the Singer 201K1.   I have read that this is the correct designation for a Kilbowie built machine originally fitted to a treadle.  I recently shortened the belt on this one.  It has made a world of difference.  The belt must have stretched making it tricky to get the machine to start and stop.  It had a tendency to run backwards at the beginning, run-on when stopping and stalling altogether when crossing thicker seams.  I took about 3/8ths of an inch off the length for the time being and now the machine is performing faultlessly.

The thread is Gütermann 100% cotton and the machine is set to 15 stitches per inch. I used my trusty cloth guide to help maintain a scant quarter inch seam.  I chain pieced the 18 remaining cream coloured squares to 18 of the mixed colours, three of the six different fabrics.  This is the resultant heap of chain piecing.


I snipped the paired squares apart and had a bit of a tidy up.  Here are the paired up squares stacked on the treadle table prior to pressing.  I production lined my pressing.  Pressing all 27 pairs as sewn and then open with all seams away from the cream squares.  I tried letting all my pressing cool on the ironing board before moving the units.  I'm told it helps the pressed seam allowances stay put.


My next step was to add the remaining nine cream squares to the opposite edge of the red ones.


And then the remaining 18 mixed colours to the other pairs.  Selection of the mixed prints at this stage isn't too crucial.  The reason for this will become clear next time.


Much more pressing and the nine patches are starting to take shape!  From winding the bobbin to taking the last photograph took just under three hours.  A nice way to spend a blustery Sunday afternoon.


Thursday 30 January 2014

Bonding with Singer 15K80

One day early last autumn I got out the Singer 15K80 to do a quick job sewing some furnishing weight chintz.  The cotton thread I used was pretty old, it came from a wooden spool that arrived with the machine, and thicker than the usual polyester I buy.  I really struggled to get the '15' to produce anything like the kind of stitched vintage Singers usually make.  The stitches were loose at the beginning of the seams then would improve - a bit.  The best I could do was to back the top tension right off to get the top and bottom threads balanced but then the overall impression that the stitches gave was somehow sloppy.  It was hard to distinguish neat individual stitches making up the line.  Hard to explain and I didn't take any pictures at the time.

The poor quality of these stitches in spite of many rethreadings and much adjustment of the top tension were rapidly making me fall out of love with this machine.  I have often thought of the 15 as a bit of an odd ball in the Singer stable with its odd man out bobbin and bobbin case.  Three of my machines take class 66 bobbins so why did I even need the hassle of yet another type of bobbin?  For a few minutes I even considered throwing in my lot with the 15k80 and selling it.

Instead I did some thinking and research and came to the conclusion that my problems were, more than likely, related to bottom tension.

It took me quite some time before I could find some really useful practical advice on how to set up from scratch a class 15 bobbin case.  One method I watched on You Tube relied on buying a new bobbin case set up at the factory and then pulling yards and yards of thread through the tension until you develop a 'feel' for what should be the right tension - er there must be a more scientific way than that…!

And of course there is.  A big thank you to Charles Day who submitted these instructions to singersewinginfo.co.uk helping people like me (and you?) to improve the performance of their vintage Singers.

Step 1: weigh out just under one and a half ounces of sugar


Step 2:  put the sugar inside a tiny ziplock back.  The one I used came with spare buttons for one of The Much Beloved's shirts and was just the right size.


Step 3:  Tie the bobbin thread to the bag of sugar.  My bag happened to have a small hole punched in it for just that job.


Step 4:  Load the bobbin into the bobbin case.  The first time I did this I discovered that the tension on this bobbin case was so light that the bag of sugar quickly dropped to the floor sending the bobbin spinning in its case.  Ah-Ha!  So there's the cause of my sloppy stitches and inconsistent tension.


Step 5:  Using the small screwdriver; little by little I tweaked up the tension until it was sufficient to just hold the bag swinging in mid air.  A sharp upward motion should allow one to two inches of thread to be pulled off the bobbin before it comes to rest in mid air again.


Step 6:  Load the bobbin and case into the machine; check the thread path of the top thread;  adjust top tension to balance the top and bottom threads; admire the beautiful even straight stitches produced by class 15 Singers.  I think I may have just found a new favourite.


Saturday 18 January 2014

New check spring for Singer 28K

This handsome little machine is my Singer 28K.  It was my first and it was this machine that got me started on sewing.  On it I sewed my first ever garment, pieced my first quilt top and then went on to quilt and bind that quilt.  It's not very easy for a beginner to quilt a single bed sized quilt on a three-quarter sized machine fitted with a fixed straight-stitch foot but the results are satisfying.

Singer 28 Sewing Machine

The machine had been given to a colleague of mine who is a wiz with fancy dress.  She didn't feel it was really the machine for her so the 28 had been stored under her desk at the office for some months.

When it arrived there really wasn't much wrong with it.  It looked like it hadn't been used for a long time and although slightly dulled and with a few blemishes there were no signs of significant rust.  It came with the essentials; a fixed straight-stitch foot, a shuttle, one bobbin and a blunt needle.  The only real problem was that the check spring, which on Singer 27/127 and 28/128, is comparatively long, unguarded and therefore vulnerable to damage, had been snapped.

The check spring is the fine wire spring which will usually be found somewhere in the region of a sewing machine's tension disks.  It's job is to remove slack in the thread as the take up arm rises to the top of its stroke after the stitch has been formed.  If the tension on the check spring is too little or the spring is missing the machine will be unable to form good stitches.


This machine was actually able to form a pretty good stitch even without a properly functioning check spring.  However I knew it would do better if it was in tip-top condition so I bought a new one.  If you are looking for one it is worth knowing that a spring from a 27 will fit a 28 and vice versa.

Singer 27 check spring

The new check spring has a loop at one end for the thread,  a long straight section, a row of even coils and one small coil at the end.  The whole thing slips neatly over the tension assembly stud.


The stud is threaded at both ends.  The narrow thread screws directly into the machine head and the split end allows the pressure on tension discs to be varied.


This photo shows the check spring in position over the tension stud.  The tail of the spring will be sandwiched between the step in the stud and the machine head casting.  This holds the spring in place and under tension.


The check spring's travel is limited top and bottom by the two notches on the machine head casting but the arm of the spring should sit on the lug mid way between these two.  The position can fine tuned by loosening the screw at the bottom of the tension assembly and sliding the slotted back plate to the left or right.


Here is a detail of the tension unit after reassembly.  The knurled nut adjusts the upper tension and shouldn't need to be much tighter than in the picture if the bottom tension is set up correctly.


With a new check spring the Singer 28k is now producing beautiful, even, balanced stitches.  Not bad work for a 115 year old!

Tuesday 7 May 2013

And the Singer 99K makes five!

Another new arrival at Oil and Thread.  Oops.  I'm sorry.  I didn't mean to do it.  I couldn't help it.  She was a local beauty, the price was right, I was weak.  Anyone will tell you these are excuses and not reasons and they'd probably be right but who could have resisted this little honey?  A 1935 Singer 99k, the bright work is unmarked and the black lacquer still has a deep gloss.

Singer 99k from front

The following were included with the machine
  • rigid straight stitch foot
  • adjustable hemmer foot
  • two class 66 bobbins
  • a couple of needles
  • Singer screw driver
  • correct instruction book
The key and the extension table are missing but as we all know a narrow screwdriver will open and lock the case with impunity and I can live without an extension table until fate is kind enough to send one my way.


Singer 99k hand crank from behind

The vendor told me that he had bought this machine from a sewing machine dealer, for his wife, in 1979.  I think she must have used it quite a bit because the bobbins were each wound with the statutory five different colours and there was a LOT of fluff behind the faceplate, around the hook and in the base.  I resorted to a vacuum cleaner and an old toothbrush.

With the fluff removed, oil in all of the usual places got shot of the slight squeak from under the machine bed.  The slide plate had been pulled off but was easy to replace by following the directions in the instruction leaflet.  The machine produced excellent stitches with balanced tension right from the word go.  It must have been well set up back in '79 because there was very little for me to do except get down to some sewing!

Singer 99k face plate
Not just a pretty face(plate).  The eagle eyed will notice that a binding foot has been fitted.  What can Mr G be up to?

Singer 99k bentwood case with logo transfer
The bentwood case is in more than fair condition but missing a key.  I will wax polish it someday I promise.

In closing today I am going to offer some buying advice.  This machine was offered for sale at auction at a tiny starting price.  I have seen similar on offer for ten and even twenty times what I paid for it.  My point?  Set a limit and then be patient.  There are a LOT of little black Singers out there in the world.  If you sit tight the right one will come and find you (almost).

Thursday 18 April 2013

Preparing the Singer 401G for Straight Line Quilting

Here is the needle of the Singer 401G set up with the general purposes presser foot and throat plate.  This is how the machine was when it arrived and how it normally lives.  There are easy changes I can make to the machine to improve its quilting performance.


The changes revolve around this little lot.
  • No1 a walking foot
  • No2 a straight stitch throat plate
The general purposes throat plate is pictured on the left for comparison.  Apparently the smaller needle hole helps stitch formation by offering more support to the fabric.  The benefit of the walking foot is that it helps reduce "shift".  


This robust looking lever is the means by which the throat plate can be lifted to carry out darning (notice the symbol that looks like a darn), embroidery and free motion work.  Move the lever to the far left to remove the throat plate either for cleaning (notice the cute brush symbol) or to swap the plates.


Here is the machine with the plate swapped, the walking foot fitted and the stitch length adjusted to ten stitches per inch (just like the books told me to do).


Next I made a trial sandwich using off cuts of the batting, backing and quilt top.  No point using materials that aren't similar to those in the finished project.  I played around sewing lines of quilting.  I found that the bobbin thread was only slightly visible first time so I reduced the upper tension half a number and tried again.  It took a few goes until the bobbin thread vanished somewhere inside the work.  That should do it.


Now I like quilting on the 401G with all this kit but remember - my first quilting project was pieced and quilted on a diminutive 1899 Singer 25K hand crank.  What is more that quilt, although it may never win first place and the Minnesota State Fair, actually looks ok and has been keeping me warm at nights since November 2012.  My point?  Don't let the gadgets put you off.  Think carefully, take your time, have a go!

Monday 8 April 2013

Meet the Singer 401G

Introducing:

Singer 401G Sewing Machine showing balance wheel.

"The SLANT-O-MATIC - the greatest sewing machine ever built!"

Well that's what Singer told new owners back in the late 1950s and early 1960s.  It really is quite a claim and probably an indefensible statement.  I am however quite fond of my example of the breed.

Singer 401G Sewing Machine showing needle and tension unit

I don't know how anyone couldn't fall for the streamlined 1950s styling of the Singer 401G.  Part Hillman Minx and part Roberts Radio - what's not to love?

Now I am prepared to accept that 401G might not be everyone's cup of tea but there is no denying that this machine was a range-topper in its day and, if one can bond with one, these machines still offer a lot to the domestic sewer.


Face plate open, tension unit and needleStitch length regulator

What really strikes me about this machine is the general quality and attention to detail on offer.  How thoughtful that the faceplate is hinged for cleaning and oiling and that on the inside is a threading diagram for both needle and bobbin?  The feed is fully reversible and, after the anonymous chrome knobs of the 28K and 15K, the clearly labelled indicator plate is a doddle to use.

AK3 is the setting needed to obtain a straight stitch

There is a lamp hidden behind the "Singer" name plate which is prefocused on the needle - very handy.  The red lever slides to set the position of the needle or the width of the zigzag.  The large centre knob is used to set the type of stitch.
The top of the machine opens to reveal yet another handy diagram.  This one shows the settings needed to obtain some of the many stitches the machine can produce.  The circular space int the top of the machine is where pattern cams can be fitted in order to obtain even more patterns. This machine was originally supplied with five cams.

Now those of you have been following the blog will remember that I had tracked down a set of tool drawers to match this machine.  The way these work alongside the machine and its extension table is typical of Singer's thoughtfulness at this date.

Notice the spring clips on the extension table and the profile of the edge of the tool drawers

The extension table clicks onto the top of the tool drawers

The unit attaches to the bed of the machine, the extension table is supported by the tool drawers and the overall result puts me in mind of an aircraft carrier.

And when ones is done the whole lot packs away beautifully.  It's no bigger than a large brief case but it weighs a lot more.