Showing posts with label Edge Stitching. Show all posts

Wednesday, 20 January 2016

Oliver + S: Family Reunion Dress


This is a dress I made around the end of 2014 in readiness for Christmas of that year.  I never got around to blogging about at the time.  I did however take some photographs during making up.  I bought the digital version of the pattern, printed it all out and stuck it together with tape.  I don't mind the process too much.  My version is sized to 24 months.  At the time the recipient was only 16 months but I pictured this dress getting more wear during the following summer and as it was intended to be a surprise I allowed lots of margin for growth.

I had a nice pale blue 100% cotton print in the stash, a little fusible interfacing and some reused shirt buttons.  The apparently simple, short-sleeved, A-line dress has quite a bit of detail.


The dress is shaped by tucks over the chest and back.  I sewed the dress using the Singer 201K treadle and used a vintage tuck marker to help me form the tucks.  Using the vintage attachment was fun but I would imagine that with careful measurements and thread marking one could easily manage without.


The dress buttons up the back.  I made the buttonholes on the Singer 201K fitted with Greist buttonholer.  The neckline facing is interesting in that it is turned to the right side and edge stitched in place.


The pattern has nice deep seam allowances and gives the usual modern instructions for finishing them with a zig-zag, serger or however else you might wish to.  I cribbed Muv's flat felled shoulder seams from the child's dress pattern she drafted and made.  The sleeves are hemmed, gathered and attached to the armscye before the side seams are closed.  I finished the sleeve head seam allowance with a zig-zag using the Singer 401G.  This was quick but if I made the pattern again I might make matching bias and use that to bind this seam. 


I used good old reliable French seams to close the sides of the dress which just made my zig-zag short cut on the armholes look even sloppier.

The pattern made quite a feature of what Oliver+S calls its signature hem.  This consists of a deep hem facing, worthy of the 1840s, turned to the inside and edge stitched.


The facing is then decorated with an additional five rows of topstitching spaced at quarter inch intervals.  The result is a good looking, firm hem which hangs well and is suggestive of hard wear.

This was a a very sweet little project to sew.  I would definitely make it again and would look at using Oliver+S patterns again in the future.

Tuesday, 2 December 2014

An apron and lots of bias binding (again)

Alright I promise that, during my sabbatical from blogging, I did sew something other than aprons but for the time being that is what I a bringing us all up to date on.  No more aprons for a while after today.  At least for a little while.

I have already blogged about Sewing Machine Basics by Jane Bolsover.   The pattern for this full length apron comes from that.  The pattern pieces for this and the other projects in the book are included on large sheets at the back of the book for you to trace off yourself.


The book is neatly arranged for the sewing novice.  Each chapter takes the form of a 'Workshop' which teaches the reader a new technique.  This is then followed by a project which makes use of the newly acquired skill.  The 'Bound-edged apron' project tests -guess what? - the use of binding and patch pockets.


I decided that the usefully sized pocket should not pattern match with main apron piece.  I did however try to centre the pattern piece on a motif so that over all the pocket ended up looking balanced.


I was very much in Singer 15K80 mode when I was making aprons during the late spring of 2014.  Hardly surprising I got a bit smitten with that machine once I got it sewing well.  Just look at those stitches!  I am rather proud of the triangles strengthening the corners.  Remember, after all, I was able to achieve those on a hand cranked machine which lacks a reverse feed - lots of needle down, presser foot up, action going on and I actually counted the stitches while I was sewing.


I am slightly less proud of the above nonsense.  The method of attaching the binding involved sewing through all layers at the same time - it looks a lot better from the right side.  This being me I was able to include, even on an apron with only two very simple pattern pieces, a flat felled seam, albeit a very short one at the nape of the neck.  There is no way I could "press open and finish seam allowance with a zig zag" given the machine I was using to sew this project - what's a boy to do?


I cut out the ties using a ruler and rotary cutter on the long grain of the fabric.  They are stitched along their long edge, turned through and then the open ends turned in and topstitched to the apron edges with a square and cross thingy.
  

All the raw edges are encased with home made bias binding.  Lots of measuring and fun!  Recognise the green fabric from the second apron with a ruffle?  I told you my stitching looked more even from the right side didn't I?


Here is the finished apron all ready to be sent off it's new owner - ignore all those work shirts that needed ironing!

Sunday, 30 November 2014

Another apron with a gathered ruffle

This ruffled apron is separated from the first by about eighteen months of time.  The first was such a hit with the ladies of the family that a second was needed to prevent a charge of favouritism on my part.  I was able to take more detailed pictures of the second apron before I gave it away to my Mam.


This apron is made of printed cotton poplin and lined with some plain white poly-cotton so that the raw edge of the ruffle is fully enclosed and the apron has a nice amount of heft, or body, or whatever you want to call it.


 The curved patch pocket is edge-stitched in place.  The side seams are angled slightly toward the top so that the pocket forms an open bag.


This being apron mkII I knew that I wanted to make sure to match the bobbin thread to the white lining fabric rather than to the green pocket.  Sewing with two different colours of thread is a dead giveaway for uneven tensions so full marks to the Singer 15K80 I sewed this with!


The ruffle is gathered at a ratio of 2:1.  When I first used this pattern I sewed the running stitch for the gathering by hand.  This time I was bold, I was brave, I was fearless and used a vintage Singer ruffler attachment.  I had to mess about with scraps a bit to get the fullness of the gathers as I wanted them.  I wasn't quite brave enough to use the ruffler to gather and sew the ruffle onto the apron in one operation as the old manuals suggest is possible - one step at a time!  I probably didn't save much time but using the ruffler was a lot of fun and the results are a pleasing firm even gather.


The instructions on finishing the ties are pretty nifty too.  The square ends are folded in on themselves at 45 degrees to produce neat points that are pressed and edge-stitched in place.


And one last close up of the hemmed edge of the ruffle in case any one is any doubt over how tasty the stitches produced by a 56 year old machine really are!


Sunday, 22 September 2013

Has anyone ever heard of a Hussif?

I hadn't until I was chatting to follower Ken a week or two ago.  I thought I knew what he was talking about until Monday when I treated myself to a copy of the Merchant & Mills SEWING BOOK.  When I saw a photograph of their project Hussif I realised the picture I had in my head was well off beam.  It turns out that a Hussif is a pocket sewing kit with some whimsical etymology thrown in for good measure.

I am rather taken by the Merchant & Mills SEWING BOOK.  It's an aesthetically pleasing object in its own right and the projects inside are, for the main part, non-gender-specific which makes a welcome change for the male seamster.

As a confirmed old bachelor with some heavy unbleached calico on his hands I figured that a Hussif is the nearest I am likely to get to a housewife and resolved to knock one up [perhaps I should rephrase that!?]

Here are some pictures of my version

Pocket Sewing Kit - open

There are seven pockets for bits and bobs sewing notions.  I made mine the same size as the instructions but the book encourages makers to adjust pocket sizes to fit the objects in their own sewing kit.  The striped ticking covers two layers of cotton quilt wadding which form a pin cushion cum needle case.

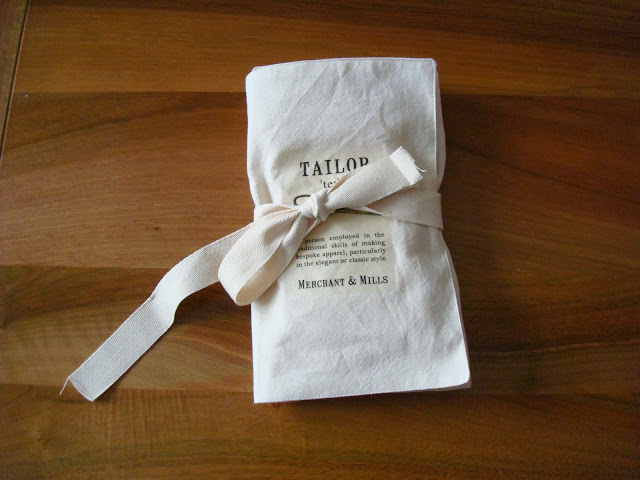
Pocket Sewing Kit - closed

Here is the Hussif all furled up and tied shut.  To give you an idea of size the cotton webbing tape is 25mm (yes I've gone metric today) or one inch wide.  I may trim the tape down a bit once things have stretched out a bit.

The first of two big adventures in making this project was printing the downloadable Merchant and Mills graphic onto what can only be described as magic paper and then transferring this to the front of the Hussif using the iron.


I think I may have overcooked the transfer slightly and the instructions on where to position it were not Gavin-proof (I may have got the graphic upside down) but overall I am pleased with the effect.  I am left with some mixed feelings about putting a company logo onto an item I have made but I like the look of the finished project and I have tried out something I never would have done otherwise.  My mind is now teaming with ideas for some kind of Oil & Thread transfer.  Possibly featuring a hen if I can find copyright free image to use.

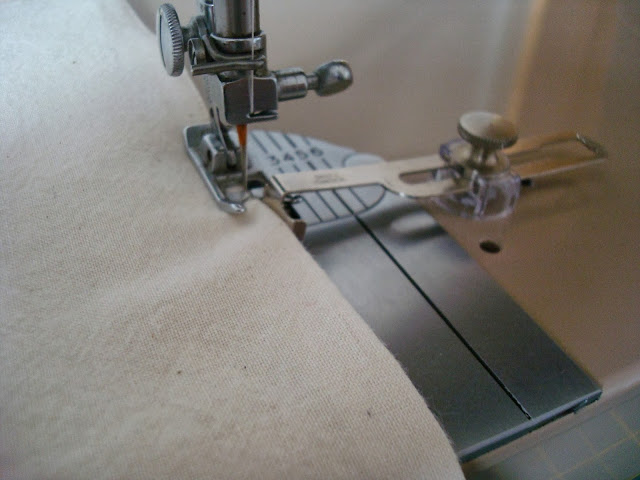
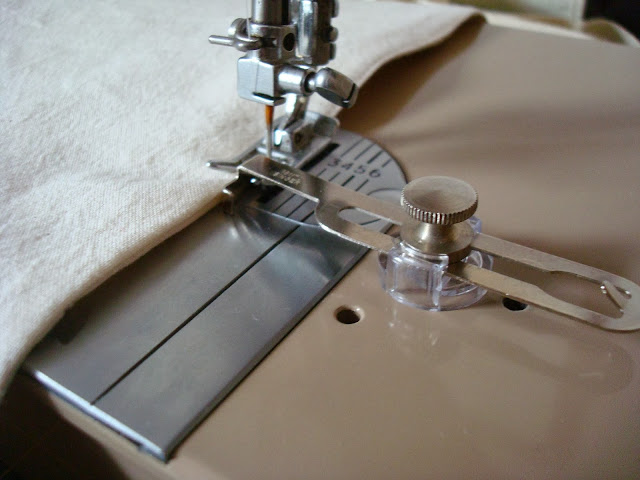
Adventure number two is a Singer 401G related discovery and one for the seam guide junkies amongst us (you know who you are).  I have discovered that the toe of the general purposes foot can be made to sit under the seam guide.  This is shown in the section of the Manual which shows how to blind stitch hems using the "BO" setting.  I realised that, with the needle centred (red lever at position 3), this gives scant ⅛ seam allowance.

Singer slant shank general purpose food and seam guide
Singer 401G: General purpose foot and seam guide

When would want a scant ⅛ seam allowance?  Well I found it handy when edge stitching the Hussif.  I hope you agree that the results are pretty tasty.


I am planning to hold on to this particular Hussif myself.  I have something in mind for it.  I really enjoyed putting this together.  It's a good way to spend a Saturday afternoon.  At this point in September I am thinking that one or two of these, filled with some 'heritage' style notions might make good Christmas presents.