Showing posts with label Singer 99K. Show all posts

Sunday 6 April 2014

It's curtains… for the sewing room

I moved house twice in 2013.  I have been lucky in that both of the dwellings allow for a designated sewing room.  Some of you will remember the first one from the blog entry last Summer.  The second has seen more service as a spare bedroom than for sewing.  I think this is because it is equipped with a futon rather than a decent cutting table.  It does however have a fantastic 1930s sideboard in which to store fabric, haberdashery and patterns and the room has enough floorspace for the Singer 201K in its cabinet.

The previous owners left behind a black-out roller blind and an empty curtain track so I thought I would have a go at curtains.

I was inspired, in part by one of my Christmas presents [am I really blogging about Christmas presents in April?] Sewing Machine Basics by Jane Bolsover...


… which contains instructions on how to make sheer curtains…


...and partly by a pair of poly chiffon curtains that came from one of The Much Belovéd's previous residences.  The curtains would not typically be my first choice of fabric but they were unlikely to be used again elsewhere, sheer and would therefore work well with the existing blind, free and available and therefore of no consequence should I happen to ruin them.


I laid a curtain out on the floor which was the only place big enough to do so.  The top of the curtain was finished with a tab top and the bottom partially finished with an overlocker.  I suppose the idea was to hem them yourself to the required length.  I rather suspect that this pair of curtains may have been supplied with their own packed of fusible webbing for just that purpose.

The tab top wasn't going to be much use to me because the type of curtain track I had inherited so the first thing to do was to get rid of it.  I set about it with my sharp shears.  The nasty plasticky label also disappeared along with the top hem.  Imagine putting a great heavy label like that on an item made of transparent fabric!


This operation left me with a long piece of cloth, hemmed on two sides, overlocked across the bottom width, with raw across the top.  Each curtain was more or less the width of my window and, from what I had read, using both would give me a nice fullness when gathered over the window.

The next step was to turn my attention to that overlocked bottom edge.  I decided to look upon that partial finishing as a gift on this slippery sliding shifting fabric and use it to help me produce my hem.
I began by turning up 1½ inches.  I turn the folded edge up again so that the line of overlocking was enclosed by my first fold.  This gave the bottom hem a triple thickness and a nice bit of heft which should help with the hang of the finished curtains.   I felt the need to use a great many pins to hold this turning in place.  The fabric handled something like a cross between a crisp packet and a bin liner.

The instructions in the book are to pin and then hand baste (tack) every bit of sewing you do.  I am sure that this approach produces fantastically neat results… … eventually.  A big apology to the purists but I just couldn't face that kind of investment of time in a piece of second hand polyester.  I managed to produce a decent hem using plenty of pins and the 1936 Singer 99K hand crank.  The machine handled a fabric which would not be invented until five years after it was built pretty well I thought.  I was sure to use a light tension to avoid puckering though.  I used a cool iron to press the hem because I was terrified the fabric might melt.  It just about holds a crease but not for very long.  More on how things went at the other end of the curtain next time!

Saturday 12 October 2013

Wrap Around Pinny Finished

This is one of those sewing projects that stalled and would not restart for some time.  It was nearly finished for ages but now it is really finished.


If I had a dress form I could have shown this off a little better but the coat hanger give some idea.  The pinny crosses over at the front and ties with a slim bow at the back.


The two ties are secured at the waist with a rectangle of topstitching on the inside of the pinny.


The tie on the left front passes through a small gap in the side seam under the armhole on the righthand side of the pinny.  I reinforced this with some back and forward stitches rather than a worked buttonhole.  This is a utility garment after all.


The stalling point for me was the bias binding.  There must be about five yard of the stuff on this garment.  I made my own and first tried to attach it with the vintage binding foot on the Singer 99K.  The straights went well but it struggles with sharper curves and crossing seams.  I had to unpick the dodgy bits and go back over them with the regulars straight stitch foot.


I didn't even attempt it on the armholes.  I went out and bought a bias binder maker which is loads of fun to use and attached the binding by pinning and sewing once through all five layers.  Not the finest of finishes but fine for doing the dishes in.


Not that I will be wearing it for washing the dishes or scrubbing the front step.  It's far too small.  It has however provided me with practice using bias binding and probably the confidence to have a go at making a dressing gown sometime soon.

Monday 12 August 2013

Wrap Around Pinny

The instructions on how to create the pattern pieces are very clear and quite simple.  The garment is made up of three pattern pieces which are easy enough to draft.  I found my 24x6 quilting ruler useful.  I used squared pattern paper but as my instructions were imperial and my grid metric this was a questionable benefit.  Inch square paper doesn't seem to be that easy to find in the UK anymore.  A French curve might have been handy for the armholes and neck line but I made a passable free handed attempt.


One of my sister's neighbours was kind enough to send me a good sized bundle of fabric she no longer wanted.  These two fabrics were included.  The yellow is 100% cotton printed with a design called "Seagull" as well as gulls the motifs include starfish and sea shells.  The blue deck chair stripe feels more like poly-cotton and had been hemmed as [Wendy House?] curtains in the past.  I didn't have enough of either to make anything large but I thought the two designs worked well together in a seaside-y kinda way.  I estimated that I would have enough fabric to piece the pinny with enough of the blue stripe left over to make the bias binding for the armholes and edging.


I elected to use the diminutive Singer 99K for this project.  I hadn't touched it since I altered my ironing board cover so I thought it was owed a spin.  As you will have seen from Saturday's post the designated sewing space is far too messy to use so I opted for the dinning table for this project.  The 99K is also the easiest machine I have to carry over there.  The blue poly-cotton is a good bit lighter than the Seagull cotton and has a tendency to pucker.  I improved matters greatly by backing off the tension about three-quarters of a turn.  The pattern includes a "⅜ inch turning".  I guess that is 1940s speak for seam allowance.  Interestingly my seam guide has a default setting for a perfect ⅜ inch seam allowance when set up as below.  Was this once some kind of dressmaker's standard I wonder?


I tried my hand at directional sewing.  Starting at the hem and sewing toward the waist.  Did I get it right?

Regular readers will know what a fan I am of flat felled and French seams but both of those options felt a little bit over engineered for a pinny so I decided to try a technique I had read about in a few different places on the internet.  I think it was probably a post on someone else's blog, which I now can't find, which put the idea of this kind of seam finish and domestic work wear together in my head.  I gather that this was a common seam finish in the days before zigzag sewing machines or over lockers.  It is very simple to do you just make a line of stitching within the seam allowance.  The stitches are supposed to act as a barrier to fraying.  I used the ⅛  side of the presser foot, against the edge of the seam allowance as a guide for my row of stitches.  On a ⅜ seam allowance this means that the ¼ inch side of the foot was against the middle of the seam.  Neat or what?  I love it when a plan comes together.  A more upmarket looking variation on this theme, which I have yet to try, suggests turning the raw edging of the seam under and then stitching.


The only down side to using this seam finish is that you end up sewing each seam three times.  The skirt of this pinny calls for no fewer than ten (yes ten!) separate panels (or should that be gores?) so I had the little 99K really chattering away to itself.

So now I have to make yards of bias binding and some apron strings.  Watch this space.

Tuesday 4 June 2013

Tiny Dress Techniques

I was inspired to make this tiny sun frock after watching BBC TV's  The Great British Sewing Bee.   


I have never made a frock before so I thought I would start small.  The dresses they made on TV were very cute.  They had shirred bodices and rouleau straps.  What struck me, when watching the judging of the dresses made by the contestants, was the number of different techniques that could be demonstrated in such a small garment.

I don't have any shirring elastic in the house.  In fact I haven't seen any since I was a little boy and my Mam put some in the cuffs of one of the sweaters either she or Gran had knitted for me.   It was blue flecked wool with a crew neck and I rather liked it.  I would put money on that same bobbin of shirring elastic still being in my Mam's mending box 30 years later.  I must ask her the next time we Skype - I digress.

With no shirring elastic in the house, and no desire to go and buy any, a shirred bodice was out.  I don't have a gathering foot either.  Does anyone know if the braider foot from the Singer 28K's archaic tool kit would work?  From what I can gather that foot, teamed with additional bits and bobs, was for braiding, quilting, hemming and binding - Dr Singer's Universal Cure All!  Anyway, I found this pattern online.

I had plenty of off-cuts of nice white cotton kicking around after I finished making the backing of the log-cabin quilt so I set to work.  I wanted this project to be a work out for the new (to me) Singer 99K and an exercise in using as many different accessories as possible.
  1. French seams (seam guide)
    In the short time I have been sewing I have made the seam guide my right hand (this is almost literally the case when you are sewing with a hand crank).  The seam guide is so useful on little black Singer's that don't have markings on their needle beds.  I found Muv's video on French seams indispensable with this task.

  2. Gathering (ruffler)
    Lots of people, I have read online,  are afraid of the ruffler foot that came with their machines.  I have never been afraid, more unsure, of how to control the results on a project I might already have spent a lot of time on.  This project was different.  The whole point was to try different techniques and attachments without getting hung up on the results.  I set the ruffler to 'gather' rather than pleat, set the Singer 99K for the longest stitch and the ruffler to the fullest gather.  By luck rather than hard work and good management the skirt ended up gathered to nearly exactly the same width as the bodice. WOW!

  3. Corded piping (adjustable cording foot)
    This felt like a biggie.  I got to cut my first bias binding from a scrap of striped poplin shirting.  I used the corded handle from a gift bag and got to try out the adjustable cording foot.  I have used it to install the zipper in a hobo bag I made on the Singer 201K.  I think my first attempt is passable but it was more about the learning experience.  I am encouraged to use this technique in the future.

  4. Hemming (adjustable hemmer)
    I did try this but it really wasn't successful.  It felt impossible to get the bulk of the French seams through the adjustable hemmer.  This fabric has a strong pattern of squares which was a gift for turning a regular hem so I did that.  Job done.

Tuesday 7 May 2013

And the Singer 99K makes five!

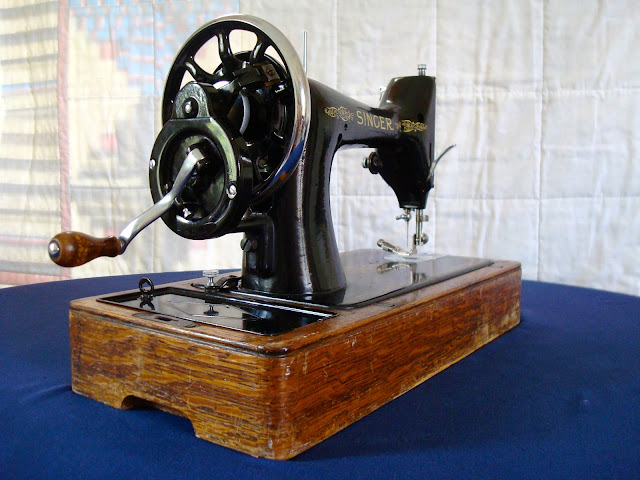
Another new arrival at Oil and Thread.  Oops.  I'm sorry.  I didn't mean to do it.  I couldn't help it.  She was a local beauty, the price was right, I was weak.  Anyone will tell you these are excuses and not reasons and they'd probably be right but who could have resisted this little honey?  A 1935 Singer 99k, the bright work is unmarked and the black lacquer still has a deep gloss.

Singer 99k from front

The following were included with the machine
  • rigid straight stitch foot
  • adjustable hemmer foot
  • two class 66 bobbins
  • a couple of needles
  • Singer screw driver
  • correct instruction book
The key and the extension table are missing but as we all know a narrow screwdriver will open and lock the case with impunity and I can live without an extension table until fate is kind enough to send one my way.


Singer 99k hand crank from behind

The vendor told me that he had bought this machine from a sewing machine dealer, for his wife, in 1979.  I think she must have used it quite a bit because the bobbins were each wound with the statutory five different colours and there was a LOT of fluff behind the faceplate, around the hook and in the base.  I resorted to a vacuum cleaner and an old toothbrush.

With the fluff removed, oil in all of the usual places got shot of the slight squeak from under the machine bed.  The slide plate had been pulled off but was easy to replace by following the directions in the instruction leaflet.  The machine produced excellent stitches with balanced tension right from the word go.  It must have been well set up back in '79 because there was very little for me to do except get down to some sewing!

Singer 99k face plate
Not just a pretty face(plate).  The eagle eyed will notice that a binding foot has been fitted.  What can Mr G be up to?

Singer 99k bentwood case with logo transfer
The bentwood case is in more than fair condition but missing a key.  I will wax polish it someday I promise.

In closing today I am going to offer some buying advice.  This machine was offered for sale at auction at a tiny starting price.  I have seen similar on offer for ten and even twenty times what I paid for it.  My point?  Set a limit and then be patient.  There are a LOT of little black Singers out there in the world.  If you sit tight the right one will come and find you (almost).