Showing posts with label Projects. Show all posts

Friday 19 February 2016

Patchwork peg bag

After years of flat-dwelling, one of the nicest things about living in a house, with a garden, is the ability to dry clothes on a line.  The wonderful smell of freshly laundered sheets blown dry by a sunlit spring breeze!  But this means pegs.  We had the pegs laying around in the bottom of the clothes basket for a few months before I came across the perfect pattern for a peg bag in a magazine.

Here is my version.  The front is made up of four strips of scrappy patchwork which is pieced first to make panel which can be cut down to shape and size.

Patchwork peg bag front


The patchwork front panel is lined with a cream-coloured honey bee print cotton left over from another project.


I used an oh so simple straight stitch to finish the seam allowances together.


seam finish

The hook and crossbar are taken from a child's clothes hanger.  Usually hangers are curved.  This one happened to be straight but is easy enough to shape the top of the bag to suit whatever you have to hand.  A gap in the seam at the top centre of the bag allows the hook to protrude.  Very useful to hang the bag on the line leaving hands free for the washing.


The back is a single piece but could just as easily be patchwork if you had the inclination.  I rather love this cheerful little bag.

Peg Bag back

Tuesday 9 February 2016

Disappearing Nine Patch - Part I

I have decided to start my sewing year with a quilt.  I've spent quite a while thinking about what I want to do with fabrics I already have and in the time I have available.

I have been reading up about disappearing nine patch quilts here, here and here.  I was taken with the setting which imitates sashing and corner stones and decided that might work with the fabrics I have to hand at the moment.

Working from the premise that my individual squares would be cut at five inches based on the common size of commercially available charm packs I began to do some sums.

My quilt will be made up of nine nine patches that's 84 individual squares which would equate to two commercial charm packs at 42 squares each.  These will be made up of:

  • Nine red for centre of the nine patch blocks - these will become the corner stones
  • Thirty-six cream for the middle patches on each side of the blocks - these will become the sashing
  • Thirty-six coloured prints for the corner patches of each block - I cut six of each from six different fabrics


Here are all the squares cut out nice and tidy - a couple of hours work over a couple of evenings last week.  Speed is of the essence with this project as I don't have loads of time and I need to keep the momentum up.

The next step was to chain piece nine red squares to nine cream and then set aside nine cream for later.


I am working on the Singer 201K1.   I have read that this is the correct designation for a Kilbowie built machine originally fitted to a treadle.  I recently shortened the belt on this one.  It has made a world of difference.  The belt must have stretched making it tricky to get the machine to start and stop.  It had a tendency to run backwards at the beginning, run-on when stopping and stalling altogether when crossing thicker seams.  I took about 3/8ths of an inch off the length for the time being and now the machine is performing faultlessly.

The thread is Gütermann 100% cotton and the machine is set to 15 stitches per inch. I used my trusty cloth guide to help maintain a scant quarter inch seam.  I chain pieced the 18 remaining cream coloured squares to 18 of the mixed colours, three of the six different fabrics.  This is the resultant heap of chain piecing.


I snipped the paired squares apart and had a bit of a tidy up.  Here are the paired up squares stacked on the treadle table prior to pressing.  I production lined my pressing.  Pressing all 27 pairs as sewn and then open with all seams away from the cream squares.  I tried letting all my pressing cool on the ironing board before moving the units.  I'm told it helps the pressed seam allowances stay put.


My next step was to add the remaining nine cream squares to the opposite edge of the red ones.


And then the remaining 18 mixed colours to the other pairs.  Selection of the mixed prints at this stage isn't too crucial.  The reason for this will become clear next time.


Much more pressing and the nine patches are starting to take shape!  From winding the bobbin to taking the last photograph took just under three hours.  A nice way to spend a blustery Sunday afternoon.


Sunday 30 November 2014

An apron with a gathered ruffle

Dear readers and follows I am sorry not to have written sooner.  I really don't know where the time has gone.  More responsibility at work plus regular weekend working, a new home with, for the first time, a garden?  Big changes seem to have left little time for blogging and sewing during 2014.  The choice: sew or blog so I sewed and left the blog in free fall.  Similar to not getting in touch with a friend or relative the longer you leave it the harder it gets.  Time for an update?  Past time!

The pattern for this apron came from the Liberty Book of Home Sewing.  My version, pictured below, was one of the first things I made on the Singer 401G - months before I wrote my first blog entry.  It's modelled beautifully by my gorgeous and glamorous sister.  The apron was a birthday present for her.


 I really enjoyed putting this project together.  It was one of the first things I shopped for specific fabric for.  It's made of Liberty Tana Lawn in the Carline and Glenjade patterns.  It really is lovely stuff to work with as I am sure many of you will know.  The pattern requires only two pieces which I drew on squared paper following the instructions from the book.  The waistband, ties and frill are all straight cut across the width of the fabric using a rotary cutter.

The apron was fun to make and allowed me to develop a couple of new to me, at the time, skills

  1. Patch pockets
  2. Gathering
  3. Bagging a lining
I followed the book instructions for gathering the ruffle which involved hand sewing a running stitch the length of it.  This must have added quite a bit of time to the making.  I didn't know at the time that I could just have easily sewn a long machine stitch with a loose top tension in much less time and achieved the same effect.  Thank goodness I have read some more books since then.  The next step was marking both the apron and the ruffle with pins at different spacings and gathering the latter down to the same spacing as the former.  The result was pricking even gathers!

The one other thing I would have done differently in hind sight was to make sure I matched the bobbin thread to the apron lining when I attached the patch pocket.  I never thought - experience (or lack there of) once again.


Sunday 6 April 2014

It's curtains… for the sewing room

I moved house twice in 2013.  I have been lucky in that both of the dwellings allow for a designated sewing room.  Some of you will remember the first one from the blog entry last Summer.  The second has seen more service as a spare bedroom than for sewing.  I think this is because it is equipped with a futon rather than a decent cutting table.  It does however have a fantastic 1930s sideboard in which to store fabric, haberdashery and patterns and the room has enough floorspace for the Singer 201K in its cabinet.

The previous owners left behind a black-out roller blind and an empty curtain track so I thought I would have a go at curtains.

I was inspired, in part by one of my Christmas presents [am I really blogging about Christmas presents in April?] Sewing Machine Basics by Jane Bolsover...


… which contains instructions on how to make sheer curtains…


...and partly by a pair of poly chiffon curtains that came from one of The Much Belovéd's previous residences.  The curtains would not typically be my first choice of fabric but they were unlikely to be used again elsewhere, sheer and would therefore work well with the existing blind, free and available and therefore of no consequence should I happen to ruin them.


I laid a curtain out on the floor which was the only place big enough to do so.  The top of the curtain was finished with a tab top and the bottom partially finished with an overlocker.  I suppose the idea was to hem them yourself to the required length.  I rather suspect that this pair of curtains may have been supplied with their own packed of fusible webbing for just that purpose.

The tab top wasn't going to be much use to me because the type of curtain track I had inherited so the first thing to do was to get rid of it.  I set about it with my sharp shears.  The nasty plasticky label also disappeared along with the top hem.  Imagine putting a great heavy label like that on an item made of transparent fabric!


This operation left me with a long piece of cloth, hemmed on two sides, overlocked across the bottom width, with raw across the top.  Each curtain was more or less the width of my window and, from what I had read, using both would give me a nice fullness when gathered over the window.

The next step was to turn my attention to that overlocked bottom edge.  I decided to look upon that partial finishing as a gift on this slippery sliding shifting fabric and use it to help me produce my hem.
I began by turning up 1½ inches.  I turn the folded edge up again so that the line of overlocking was enclosed by my first fold.  This gave the bottom hem a triple thickness and a nice bit of heft which should help with the hang of the finished curtains.   I felt the need to use a great many pins to hold this turning in place.  The fabric handled something like a cross between a crisp packet and a bin liner.

The instructions in the book are to pin and then hand baste (tack) every bit of sewing you do.  I am sure that this approach produces fantastically neat results… … eventually.  A big apology to the purists but I just couldn't face that kind of investment of time in a piece of second hand polyester.  I managed to produce a decent hem using plenty of pins and the 1936 Singer 99K hand crank.  The machine handled a fabric which would not be invented until five years after it was built pretty well I thought.  I was sure to use a light tension to avoid puckering though.  I used a cool iron to press the hem because I was terrified the fabric might melt.  It just about holds a crease but not for very long.  More on how things went at the other end of the curtain next time!

Monday 27 January 2014

A nightshirt for me: McCall 8372

After successfully sewing the onesie for The Much Beloved I thought I deserved some night attire of my own.  I couldn't see myself in a one piece.  Too reminiscent of overalls - there would be real danger of me attempting an oil change in one of those.  I took a fancy to something more old school (or should that be skool?).

McCall 8372 is excellent value as a pattern.  Just look at the many garments one can make with it.  I wonder if it was one of the last non-multi-sized patterns.  I ordered the large based on my 42 inch chest measurement.


Those of you who have read the blog will know that I am keen on free or very cheap fabric especially when practicing on a new pattern.  Regulars will also know that I am quite partial to repurposing duvet covers.

I have (had) this wonderful 100% cotton Conran duvet cover bought at Heel's ages ago.  It did years of service on my bed but it must be at least four since I've used it and it now doesn't go with anything.  It's a gorgeous cotton twill ticking and much washing has improved its beautiful soft handle.  I thought it would make a great nightshirt.

The pattern has clear instructions.  Diagrams backed up with directions which take into account whether you are using a straight stitch or zig-zag machine.  There is sufficient seam allowance for  the shoulder, armscye, and side seams to be flat felled.  The neck facings are turned under and top stitched to the wrong side for a neat finish.


The shirt features a rounded patch pocket on the left front.  I made a bit of an effort to get the stripes to match up.  I missed having reverse feed when I edge stitched the pockets.


The applied cuff bands are cut on the long grain which I think makes these stripes really pop in a good way.  They are finished off with a nice bit of edge and top stitching courtesy of the 28K.


The one point where the pattern is slightly vague is when it calls for a five eighths hem giving no further instructions.  I took this to mean - turn under a quarter inch, press, turn over a further three eighths so that the raw edge is enclosed within the second fold, press again, pin and edge stitch in place.  I hope I got it right?


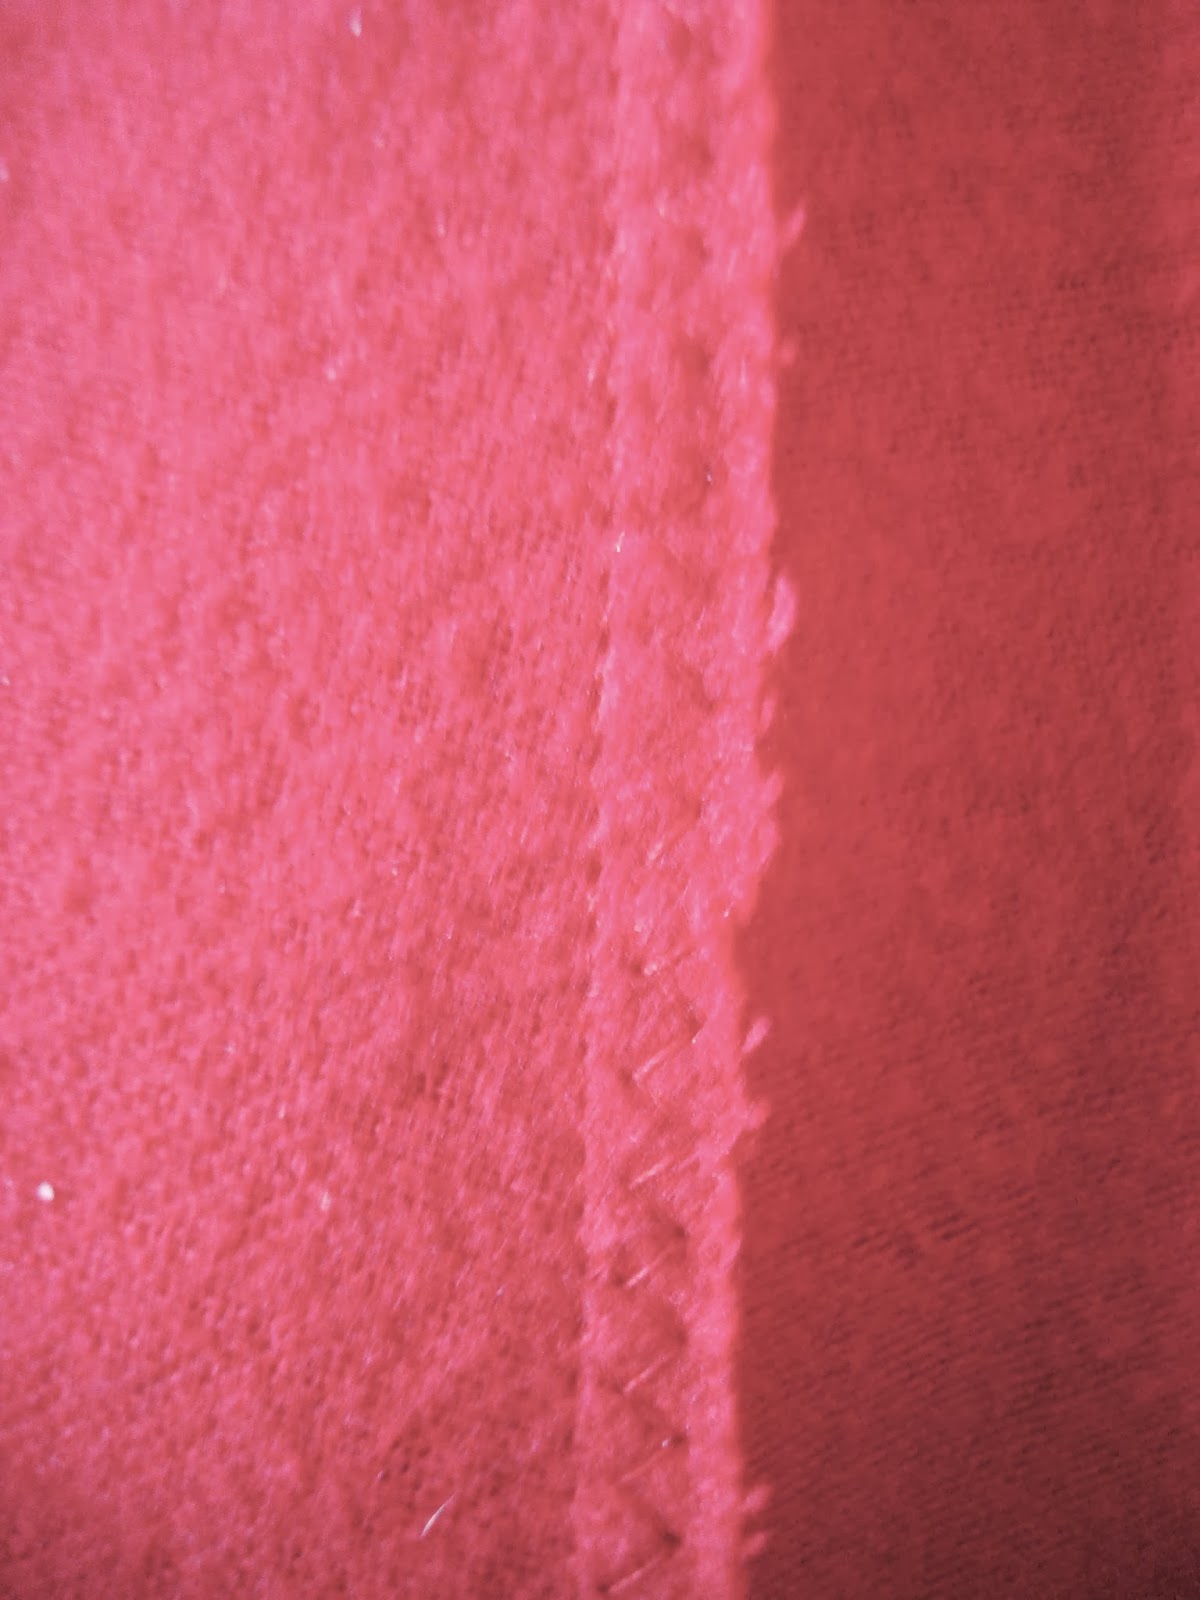
The curved hem creates a shallow split where it meets the side seam.  I had to do a certain amount of fudging where the flat fell and the narrow hem meet.  It looks a lot better from the RS and is holding up to washing so far…


I made the buttonholes and sewed on the buttons using the Singer 401G and Singer slant buttonholer.  Results are consistent.  The 28K showed off a bit more with the topstitching on the front placket.


The buttons themselves are vintage brace buttons from Ede and Ravenscroft, robe makers to the Queen. High end or what?  They are rather bigger than the half inch shirt buttons recommended by the pattern but I think they are more in scale with the relaxed characteristics of the night shirt and the colour is perfect.


The finished garment is roomy but then I suppose it should be.  The fabric feels great - soft, comfy and cosy.  I made this nightshirt for a bit a giggle but have ended up wearing it quite a lot.  I used nearly half of a double sized duvet cover, thread left over from another project and three of six buttons from some worn out suit trousers.  So in theory my night shirt cost me only my time and I still have enough of everything left to make another.


"Hey - that's really nice.  I can't tell that it didn't come from a store," said The Much Beloved.  Would that be the ultimate compliment by any chance?


Monday 20 January 2014

A onesie for The Much Belovéd: Kwik Sew K3713

It seems like onesies are ubiquitous at the moment even here at Oil and Thread where we seldom follow fashion.  According to the stats the likelihood is that by now you either own a Onesie or know someone who does.  I am guessing that fewer people have actually sewn a onesie.  Unless they happen to have a copy of Kwik Sew K3713 lying around.


I thought this pattern might appeal to The Much Belovéd.  He seemed genuinely pleased when he first saw it and quite excited when I finally got down to work on it.  He tends to run around barefoot quite a bit so we agreed on version B the footless sleep suit.

I was inspired by the colour scheme on the pattern envelope and the very reasonable price of red cotton flannel.  An error on my part concerning the fabric width led me to buying twice as much winceyette as required.  During the weekend I spent shrinking, drying and ironing this fabric it felt like we were swathed in acres of red brushed cotton.

Red rag to a bull?

The pattern really isn't complicated and the instructions are first rate.  The biggest challenge is the size of the pieces.  Laying out and cutting took up a lot of space.  It's lucky the dinning table has that extra leaf!  Once the fabric was cut its size made it more than a bit of a handful.


The pattern includes a quarter inch seam allowances which are finished by zigzagging together - must be a job for the trusty 401G.  I heeded all my old sewing machine instruction books' warnings about shortening the stitch length and lightening the tension when sewing flannel.  I think this is supposed to allow the seams to 'give' a little during wear.  Kwik Sew's quarter inch seam allowances mean no trimming - refreshing!

This shade of red has proven to be virtually impossible to photograph!


The neckband and cuffs are sewn into the main body and finished in the same way.


This was my first go at sewing stretchy knits.  I did invest in some Organ needles designed especially for stretch fabric and I played it safe by sewing with my 'modern' machine.  I quite enjoyed the experience and the results are encouraging.


The pattern includes directions for either buttons or snap fastenings.  TMB put in a special request for snap fastenings so that meant buying some new kit.  I may post a full tutorial on fitting snaps at a later date.  They went on without any trouble at all and I think they work well with this pattern.


The pattern is a very generously sized.  I cut the medium based on the measurements on the pattern envelope but in my opinion the finished garment is a shade too big for TBM.  It's actually a better fit on me and I am nearer a large these days.  If I made another (remember I ended up with enough fabric for two) I would either make the small for TMB or reduce the length of the body by 1-2 inches.  TMB was however delighted with his roomy new onesie.  The proof has been in the wearing with the onesie making regular appearances at the weekend breakfast table!

The owner was not available for modelling today

Sunday 20 October 2013

Simplicity 1960: French Back Boxer Shorts - Pt II

Here are the finished boxers.  I added the buttonholes using my new toy a Griest #1 template buttonholer for low shank machines (this means YOU Mr Singer 201K).  I was very happy with the results.  I am planning a full photo-tour and review of the new (to me) buttonholer in a future post.
French back boxer shorts

Front and back there are seven half-inch buttonholes and one additional thirteen-sixteenths vertical buttonhole which allows the waistbands to cross at the back.  It's a lot of work but we all get a buzz out of using an automatic buttonhole attachment right?


The position of the buttons at the back give a range of adjustment for expanding and contracting waists.  I think this design must have arisen from wartime and post war shortages of elastic.


The half inch (12mm) buttons I used were saved from shirts I cut up last year to turn into my first quilt.  There a total of nine so I think can be forgiven for sewing them on with the Singer 401G.  I used white thread to match the buttons rather than pink to match the shorts.  Sewing buttons on with a vintage Singer is probably worth a post all of its own sometime soon.


I am happy with the way these turned out but.  I will need to forget how much work they are before I am tempted to make them again.

Saturday 19 October 2013

Simplicity 1960: French Back Boxer Shorts - Pt I

I have had this pink and blue striped cotton shirting for months.  I picked it up cheaply on eBay.  I washed it to preshrink it ages ago and then it took me ever so long to remember to take it with me to the shops so that I could buy matching thread.  I no longer trust my memory of colour to buy thread.  Unless it's black or white.  After the fabric was preshrunk I was left with just under two yards.


That's a slightly awkward yardage - not really enough for a shirt.  I decided that the only option would have to be boxers.  I had a bit of spare time on my hands so I elected to make one of the most complicated patterns for boxer shorts in the world: Simplicity 1960 ©1945.

I have made boxers from this pattern once or twice before, retracing and redrafting the pattern to allow for my ample girth ©2013.  I pressed the pattern pieces and fabric in the usual way prior to cutting out.  I cut out using the rotary cutter with the help of Ramses II and Venus who always like to get in on the act at this stage.


The first step is to make two pleats in the fronts of the boxers.  These are clearly marked on the pattern pieces and the stripes on the fabric certainly help.


I secured the pleats with pins.


Last Sunday we did some organising in the sewing room so now I can used the Singer 201K in it's No.41 cabinet.  It's the first time it has seen any treadle action since the arsenic green Negroni shirt back in June!  I've rather missed it.  It's now positioned to the right of a window so the light, by day, is good.  I set the stitch length to the longest tacking/basting stitch 6spi.


And sewed about ¼ inch from the top of the boxers to secure the pleats.


The next step is to secure the two fronts together at the crotch seam using a flat felled seam.  This is a little tricky as the seam allowance has a curved taper from ⅝ inch down to nothing.  Careful pressing and folding and a slow but steady foot on the treadle are a must.  Lightly marking the sewing line with a pencil doesn't hurt either.


Here both fronts have been pleated and joined at the crotch.


Knife pleats

I then turned my attention to the seat panel and the questionable pleasure of creating a continuous lap.  The first time I made this pattern I actually had to look up what it was.  Thank goodness for the Internet-o-graph!


The first step is to stay stitch a V either side of the centre back.  The pattern has this V marked on it.  I marked it lightly on the fabric with a sharp pencil.


I then carefully slashed between the two lines of stay stitching - making sure not cut through the line of stitches.


And then (and this is the really silly bit) you have to open the V up until it as near a straight line as possible and pin a strip of fabric along the raw edge.


And then (the silly and HARD bit) stitch it - oh so carefully! - in place in such a way that the line of stay stitching will be enclosed.


Finally the raw edge of the strip is turned under and the fold top stitched to the right side of the seat panel.  This forms a sort of gusset.  I didn't find it easy.  It's well worth practising with scraps.  The pattern instructions call for a one inch strip for the binding.  Make it a generous inch.  I made mine nearer 1⅛ inch and was satisfied with the result.


After all that fuss sewing the seat panel to the fronts and joining the legs (all with flat felled seams) seams like child's play.

Here is where I ran out of steam.  The basic construction is complete with the two part yoke sewn to the wrong side of the shorts, folded over and then edge stitched to the right side.


Yoke front boxer shorts

The boxers still lack a hem, button holes, and buttons but they will have to wait for another day.  At the back the two piece yoke  combines with the continuous lap to form an adjustable waistband which negates the need for elastic.  How's that for austerity spec?!


French back boxer shorts