Showing posts with label Boxer Shorts. Show all posts

Sunday, 20 October 2013

Simplicity 1960: French Back Boxer Shorts - Pt II

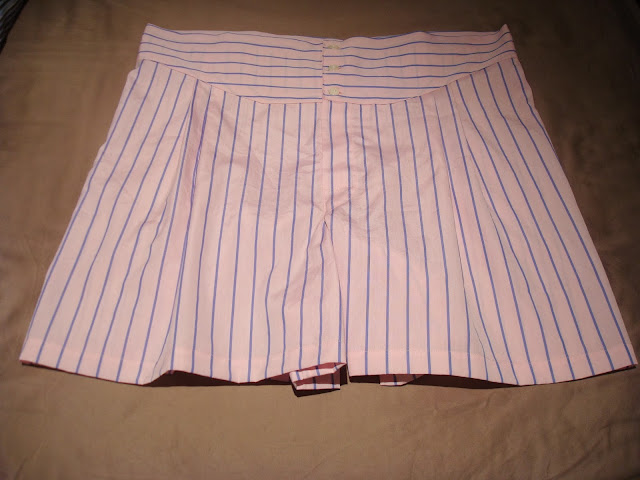
Here are the finished boxers.  I added the buttonholes using my new toy a Griest #1 template buttonholer for low shank machines (this means YOU Mr Singer 201K).  I was very happy with the results.  I am planning a full photo-tour and review of the new (to me) buttonholer in a future post.
French back boxer shorts

Front and back there are seven half-inch buttonholes and one additional thirteen-sixteenths vertical buttonhole which allows the waistbands to cross at the back.  It's a lot of work but we all get a buzz out of using an automatic buttonhole attachment right?


The position of the buttons at the back give a range of adjustment for expanding and contracting waists.  I think this design must have arisen from wartime and post war shortages of elastic.


The half inch (12mm) buttons I used were saved from shirts I cut up last year to turn into my first quilt.  There a total of nine so I think can be forgiven for sewing them on with the Singer 401G.  I used white thread to match the buttons rather than pink to match the shorts.  Sewing buttons on with a vintage Singer is probably worth a post all of its own sometime soon.


I am happy with the way these turned out but.  I will need to forget how much work they are before I am tempted to make them again.
Saturday, 19 October 2013

Simplicity 1960: French Back Boxer Shorts - Pt I

I have had this pink and blue striped cotton shirting for months.  I picked it up cheaply on eBay.  I washed it to preshrink it ages ago and then it took me ever so long to remember to take it with me to the shops so that I could buy matching thread.  I no longer trust my memory of colour to buy thread.  Unless it's black or white.  After the fabric was preshrunk I was left with just under two yards.


That's a slightly awkward yardage - not really enough for a shirt.  I decided that the only option would have to be boxers.  I had a bit of spare time on my hands so I elected to make one of the most complicated patterns for boxer shorts in the world: Simplicity 1960 ©1945.

I have made boxers from this pattern once or twice before, retracing and redrafting the pattern to allow for my ample girth ©2013.  I pressed the pattern pieces and fabric in the usual way prior to cutting out.  I cut out using the rotary cutter with the help of Ramses II and Venus who always like to get in on the act at this stage.


The first step is to make two pleats in the fronts of the boxers.  These are clearly marked on the pattern pieces and the stripes on the fabric certainly help.


I secured the pleats with pins.


Last Sunday we did some organising in the sewing room so now I can used the Singer 201K in it's No.41 cabinet.  It's the first time it has seen any treadle action since the arsenic green Negroni shirt back in June!  I've rather missed it.  It's now positioned to the right of a window so the light, by day, is good.  I set the stitch length to the longest tacking/basting stitch 6spi.


And sewed about ¼ inch from the top of the boxers to secure the pleats.


The next step is to secure the two fronts together at the crotch seam using a flat felled seam.  This is a little tricky as the seam allowance has a curved taper from ⅝ inch down to nothing.  Careful pressing and folding and a slow but steady foot on the treadle are a must.  Lightly marking the sewing line with a pencil doesn't hurt either.


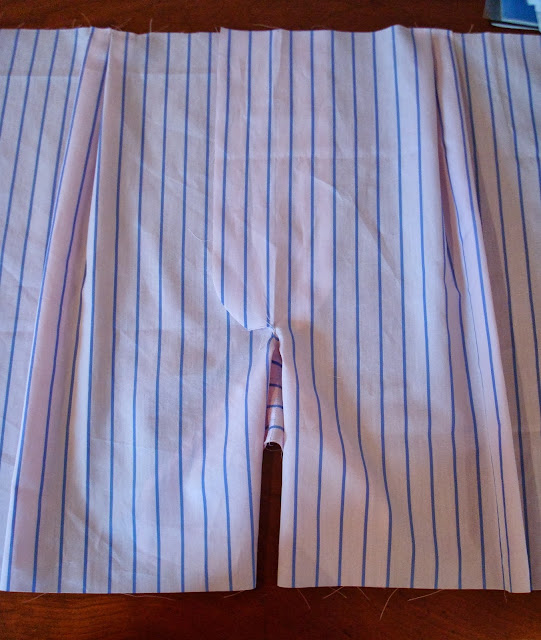
Here both fronts have been pleated and joined at the crotch.


Knife pleats

I then turned my attention to the seat panel and the questionable pleasure of creating a continuous lap.  The first time I made this pattern I actually had to look up what it was.  Thank goodness for the Internet-o-graph!


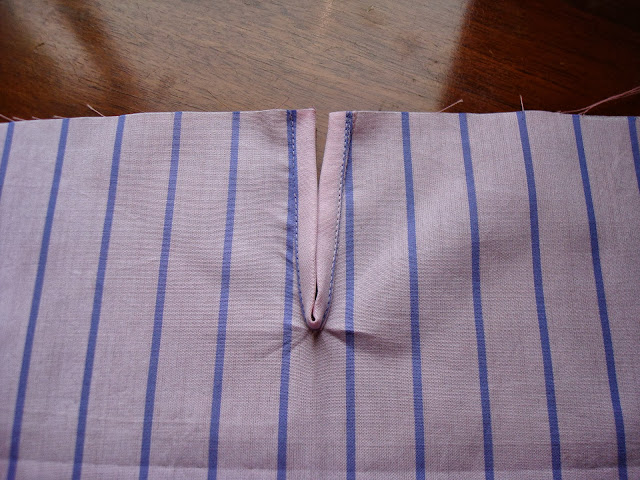
The first step is to stay stitch a V either side of the centre back.  The pattern has this V marked on it.  I marked it lightly on the fabric with a sharp pencil.


I then carefully slashed between the two lines of stay stitching - making sure not cut through the line of stitches.


And then (and this is the really silly bit) you have to open the V up until it as near a straight line as possible and pin a strip of fabric along the raw edge.


And then (the silly and HARD bit) stitch it - oh so carefully! - in place in such a way that the line of stay stitching will be enclosed.


Finally the raw edge of the strip is turned under and the fold top stitched to the right side of the seat panel.  This forms a sort of gusset.  I didn't find it easy.  It's well worth practising with scraps.  The pattern instructions call for a one inch strip for the binding.  Make it a generous inch.  I made mine nearer 1⅛ inch and was satisfied with the result.


After all that fuss sewing the seat panel to the fronts and joining the legs (all with flat felled seams) seams like child's play.

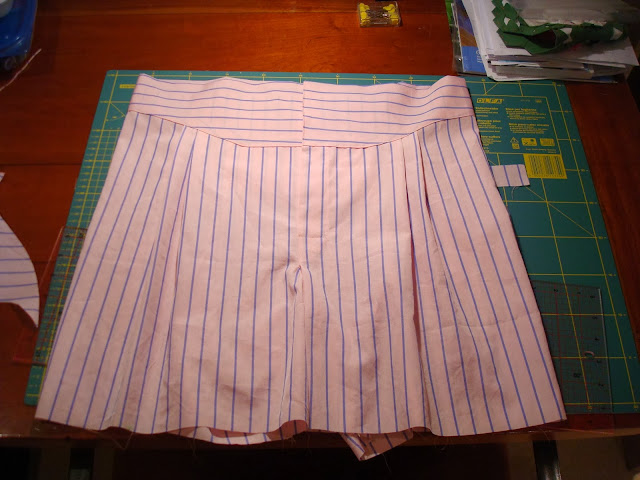
Here is where I ran out of steam.  The basic construction is complete with the two part yoke sewn to the wrong side of the shorts, folded over and then edge stitched to the right side.


Yoke front boxer shorts

The boxers still lack a hem, button holes, and buttons but they will have to wait for another day.  At the back the two piece yoke  combines with the continuous lap to form an adjustable waistband which negates the need for elastic.  How's that for austerity spec?!


French back boxer shorts

Thursday, 14 March 2013

Liberty Print Boxer Shorts

After being cleaned and oiled I felt that the Singer 15K80 needed a work out so I ran these up.

Liberty Boxer Shorts

I picked the liberty print up at Fabric Galore in Battersea  months ago.  I had pre-washed, ironed and put it into the stash ages ago.  I had even been so organised as to buy thread and elastic at the same time.

The pattern I used is fairly simple.  It uses only two pattern pieces or rather the same pattern piece cut, flipped over and cut again.  I managed to cut out and nearly finish the boxers last night and hemmed them while the dinner was cooking this evening.  I have made this pattern once before (it was my first project when I started sewing after being given the 28K) so I had a fair idea of what I was doing.

From winding the bobbin with brownish red thread to finishing the hem the 'fifteen' performed faultlessly.  The old machine seemed to run more smoothly and more quietly with every stitch and it feels like it has some serious piercing power.  This fabric is probably 'dress weight' and as such maybe a shade heavy for boxers but two layers of it were as nothing to the 'fifteen'.  There is one point in this project where I was sewing through (I think) nine layers of cotton (it can happen) and the machine never missed a beat.

 As written the pattern suggests a zigzag and trim seam finish and even zigzagging the hem.  That isn't possible on a straight stitch machine so I did some thinking and adapted it for flat felled seams.  Neat and tidy for the inside of undies!

Flat Felled Seam

The elastic is encased in a tunnel waistband and the fly went together without too much bother.  It's not quite ready to wear but I am happy with the result and I'm sure it will be fairly robust.

Fly and Waistband inside view

At one and a quarter inches the hem is much deeper than any of my shop bought boxers but they hang well and both legs are the same length!


And I've now got plenty of scraps to turn into log cabin blocks!

Liberty Scraps