Showing posts with label Techniques. Show all posts

Tuesday 4 June 2013

Tiny Dress Techniques

I was inspired to make this tiny sun frock after watching BBC TV's  The Great British Sewing Bee.   


I have never made a frock before so I thought I would start small.  The dresses they made on TV were very cute.  They had shirred bodices and rouleau straps.  What struck me, when watching the judging of the dresses made by the contestants, was the number of different techniques that could be demonstrated in such a small garment.

I don't have any shirring elastic in the house.  In fact I haven't seen any since I was a little boy and my Mam put some in the cuffs of one of the sweaters either she or Gran had knitted for me.   It was blue flecked wool with a crew neck and I rather liked it.  I would put money on that same bobbin of shirring elastic still being in my Mam's mending box 30 years later.  I must ask her the next time we Skype - I digress.

With no shirring elastic in the house, and no desire to go and buy any, a shirred bodice was out.  I don't have a gathering foot either.  Does anyone know if the braider foot from the Singer 28K's archaic tool kit would work?  From what I can gather that foot, teamed with additional bits and bobs, was for braiding, quilting, hemming and binding - Dr Singer's Universal Cure All!  Anyway, I found this pattern online.

I had plenty of off-cuts of nice white cotton kicking around after I finished making the backing of the log-cabin quilt so I set to work.  I wanted this project to be a work out for the new (to me) Singer 99K and an exercise in using as many different accessories as possible.
  1. French seams (seam guide)
    In the short time I have been sewing I have made the seam guide my right hand (this is almost literally the case when you are sewing with a hand crank).  The seam guide is so useful on little black Singer's that don't have markings on their needle beds.  I found Muv's video on French seams indispensable with this task.

  2. Gathering (ruffler)
    Lots of people, I have read online,  are afraid of the ruffler foot that came with their machines.  I have never been afraid, more unsure, of how to control the results on a project I might already have spent a lot of time on.  This project was different.  The whole point was to try different techniques and attachments without getting hung up on the results.  I set the ruffler to 'gather' rather than pleat, set the Singer 99K for the longest stitch and the ruffler to the fullest gather.  By luck rather than hard work and good management the skirt ended up gathered to nearly exactly the same width as the bodice. WOW!

  3. Corded piping (adjustable cording foot)
    This felt like a biggie.  I got to cut my first bias binding from a scrap of striped poplin shirting.  I used the corded handle from a gift bag and got to try out the adjustable cording foot.  I have used it to install the zipper in a hobo bag I made on the Singer 201K.  I think my first attempt is passable but it was more about the learning experience.  I am encouraged to use this technique in the future.

  4. Hemming (adjustable hemmer)
    I did try this but it really wasn't successful.  It felt impossible to get the bulk of the French seams through the adjustable hemmer.  This fabric has a strong pattern of squares which was a gift for turning a regular hem so I did that.  Job done.

Sunday 26 May 2013

The Log Cabin Quilt: Final!

Cast your minds back and you may remember that I used to write a blog here.  I didn't mean to stop writing but I didn't have anything to blog about as I seemed to have lost my sewing mojo.  I have read that this can happen.  Well my mojo has returned and I have some progress to report.

Remember my to do list?

Progress so far:


  • Machine baste around the outside of the quilt a quater of an inch from the edge of the quilt top
  • Trim away the excess backing and batting and square up
  • Cut two and a half inch strips of the red fabric for binding
  • Join strips using 45 degree seams
  • Attach binding
  • Wash, line dry and press

  • That's right!  Only a few minutes ago I put the final stitches into the binding on the quilt.  Thank you to follower Ken who explained how to make my hand stitching invisible.

    Finished log cabin cot quilt (thank you to The-Much-Belovéd for holding it up so well)
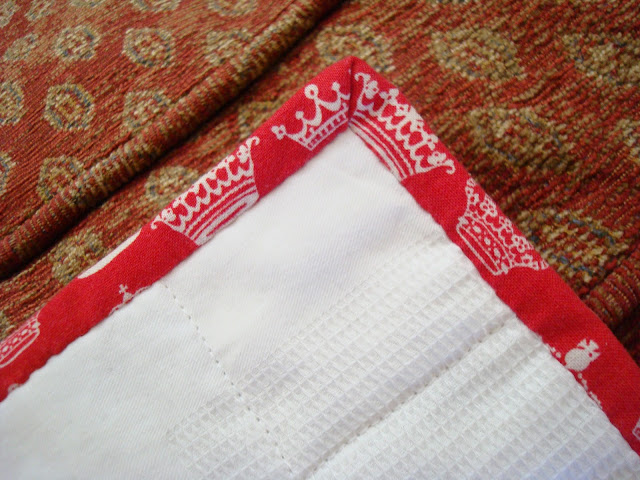
    Detail of quilting and binding back and front
    I machined the binding to the front of the quilt and then hand stitched it to the back.  Yes, it took hours!  I am happy enough with the result to make it worth the investment of time.

    How's that for a mitre?
    I am particularly pleased with the way the mitred corners worked out.  I am indebted to Lizzie Lenard's tutorial on binding.  The finish on this quilt is about a hundred times better than on my first quilt at the end of last summer.

    Well that's another project completed.  I will need to wash the quilt before I post it off to it's new owner.  I now have the excitement of starting a new project.  I wonder what's next...

    Thursday 18 April 2013

    Preparing the Singer 401G for Straight Line Quilting

    Here is the needle of the Singer 401G set up with the general purposes presser foot and throat plate.  This is how the machine was when it arrived and how it normally lives.  There are easy changes I can make to the machine to improve its quilting performance.


    The changes revolve around this little lot.
    • No1 a walking foot
    • No2 a straight stitch throat plate
    The general purposes throat plate is pictured on the left for comparison.  Apparently the smaller needle hole helps stitch formation by offering more support to the fabric.  The benefit of the walking foot is that it helps reduce "shift".  


    This robust looking lever is the means by which the throat plate can be lifted to carry out darning (notice the symbol that looks like a darn), embroidery and free motion work.  Move the lever to the far left to remove the throat plate either for cleaning (notice the cute brush symbol) or to swap the plates.


    Here is the machine with the plate swapped, the walking foot fitted and the stitch length adjusted to ten stitches per inch (just like the books told me to do).


    Next I made a trial sandwich using off cuts of the batting, backing and quilt top.  No point using materials that aren't similar to those in the finished project.  I played around sewing lines of quilting.  I found that the bobbin thread was only slightly visible first time so I reduced the upper tension half a number and tried again.  It took a few goes until the bobbin thread vanished somewhere inside the work.  That should do it.


    Now I like quilting on the 401G with all this kit but remember - my first quilting project was pieced and quilted on a diminutive 1899 Singer 25K hand crank.  What is more that quilt, although it may never win first place and the Minnesota State Fair, actually looks ok and has been keeping me warm at nights since November 2012.  My point?  Don't let the gadgets put you off.  Think carefully, take your time, have a go!

    Wednesday 17 April 2013

    The Log Cabin Quilt: Batting on the Matting

    I can hardly believe it has been a week since I last wrote on the blog.  Busy times for me if not for Oil and Thread.  Anyway this evening I feel like I have had the space and the energy to get back to work (or back to play) on the quilt.

    Since I last wrote I have been to see the lovely Angela at The Creative Sanctuary to buy some lovely Cotton/Polyester blend batting.  It's suitable for machine or hand quilting up to ten inches apart and I spent Saturday afternoon pre-washing it in the bath and then most of the rest of the weekend trying to get it dry.  Up until this evening I was wondering if it would have been worth the bother.  That was before I began to assemble the quilt sandwich.

    In the following picture I have lightly pinned the backing fabric to the carpet using quilter's pins.  I have read about this method but I found it hard to imagine that it would work.  It seemed only marginally less futile than trying to stick masking tape to fabric and carpet.  I guess a lot will depend on the type of carpet and how it is laid but here I was pleased and surprised at how I got on.


    In my second picture I have smoothed the batting out over the backing fabric.  See how lovely and fleecy the cotton mix batting is.  I have pinned the batting, making sure not to stretch it, but I have yet to trim it to size.  I did this with my shears.


    The third picture shows the quilt top added to the sandwich.  I have used the same quilter's pins to baste the sandwich.  Each of the red squares at the centre of the log cabin blocks has a pin through it.  It is worth remarking on how easy it was to get the pins to go through the cotton batting.  Progress this evening felt much smoother than my experiences working with safety pins and polyester batting on a previous project.


    My plan now is to start quilting in-the-ditch between the long cabin squares.  My hope is that this will stabilise the layers and then I am imagining some sort of diagonal grid of quilting covering the middle panel.  Have I the strength to quilt in the ditch between every one of those piano keys in the border?  Would that be too heavy a treatment?  Questions I will need to ask myself and answer but first I want to set up the Singer 401G properly for the task in hand.

    Tuesday 19 March 2013

    The Log Cabin Quilt: Progress

    Here are the log cabin blocks I have made laid out on the sitting room floor.  No design wall for me.

    Log cabin crib quilt

    Log Cabin Blocks

    Now when I started piecing these I didn't really know what I was making.  I started the green log cabins as an experiment in paper foundation piecing.  I have now made 24 log cabin blocks. That's four blocks in six different colours.  Having done this I feel that I have made as many log cabin blocks I as would like to for the time being.  I think I am tired of sewing, fabric I can't see, through a sheet of paper.

    Each of my 24 blocks will finish at seven inches square so at the moment I have a potential width of 28 inches and length 42 inches.  I think I have two options.

    1. make another 24 blocks and to create a quilt top 42 x 56 inches
    2. take what I have and use borders to bring the quilt top up to a similar size
    I have decided that I am going to go with the second option.  Thinking about borders and my small fabric stash some kind of pieced 'scrappy' border is going to the answer.  I used piano keys for the border on my first ever quilt and enjoyed making them and the finished look of them.

    Having looked at the scraps I have available I think I am going to use the red from the middle of the log cabins to add a narrow sashing border around the outside of the 24 log cabins.  Then I am going to use strips of the printed fabric, alternating with strips of the remaining white, to make the piano key border around that.  I am hoping that the red will frame the  log cabins and that the alternate white strips will prevent the outer border from over powering the centre blocks.  We will see.

    Chain Piecing with the Singer 28K - Note the seam guide set for a scant quarter inch

    Here I have started chain piecing one and a half inch strips to make the border.  This is the first time I have used this technique and I like the way it seems to save time and thread.

    Pressing Chain Pieced Piano Keys - please excuse my ironing board cover.

    These piano keys waiting to be snipped apart and trimmed open.

    Making a decision about where this quilt top is going next has reawakened my interest and excitement in this project.  I am already thinking about what style of quilting will suit this patchwork.

    Thursday 28 February 2013

    Crazy Patchwork Cushion

    Crazy Patchwork Cushion cover on chair

    Crazy Patchwork Cushion

    This cushion case is made of scraps of shirts left over from my first quilting project and various other bits and bobs including a nice hunk of "ready for action" fabric by Alexander Henry.  Some of the first stitches I made with my Singer 201K treadle hold it together.  I was inspired to make it after reading "The Quilter's Bible" by Linda Clements.

    I used a variation on Stitch and Flip but unlike the log-cabin blocks I didn't use a paper foundation for this crazy patchwork.  I pieced scraps and strips, stitching and flipping, until I had rough, out-sized, blocks.  I then used a six and a half inch square ruler and rotary cutter to 'square' the blocks.  When I had made nine of these I sewed them into what is essentially a large nine-patch unit.  I think it was best that I waited until I had all nine patches ready before sewing them together.  This gave me the chance to 'set' the blocks to my satisfaction.  I am happy that I managed to get a fairly even spread of colours here.

    I sandwiched my block with poly batting left over from that same first quilt and white poly cotton I had left over from lining an apron I made for my sister.  I quilted the sandwich on my Singer 401G Slant-O-Matic simply because it came with a walking foot.  I choose a very boring regular grid pattern and variegated blue and white thread for the quilting.  I liked the way this contrasted with the 'scrappiness' of the quilt but somehow it didn't feel enough for me so I shadowed the grid with another line of stitching using the edge of the walking foot as a guide.

    I completed the cushion cover on the Singer 201K.  I went for an envelope closure because that is the only type of cushion cover I have experience of and I was anxious to get the thing finished as a Valentine's day gift for The-Much-Beloved.  I used an adjustable hemmer and my trusty seam guide to help me get the job done as accurately and speedily as possible.

    The cover finished at an approximate 17 inch square so an 18 inch duck down cushion form makes it pleasingly plump.

    Wednesday 27 February 2013

    Piecing By Numbers with the Singer 28K


    This is a technique I am trying to teach myself from instructions I found on the internet.  It's sometimes call Paper Foundation Piecing and I've also seen it referred to as Stitch and Flip.


    I start each block with a paper foundation.  I designed this simple log cabin foundation using the table function which is part of word processing software.  If you look closely at the photograph you can see that each piece of the block has a number starting with 1 in the darkest square at the middle of the foundation.  The shading on my paper foundation is a nod to what I have read about the tonal values of traditional log-cabin blocks.

    The next step (for my block) is to cut some fabric.  The blue is the left overs of some super smooth shirting I picked up online very reasonably and the white is from one of my shirts whose collar and cuffs were past their best.  I have started to cut one and a half inch strips half an inch longer than pieces on the foundation.  This gives me my quarter inch seam allowances.

    Here I have flipped the paper foundation   and pinned my first piece of fabric over the back of the correct section.  I hold the paper up to the light to help me centre the fabric.  Notice that I have used red for the centre.  The story goes that the middle square of the log cabin block is supposed to represent the hearth of the cabin and so it is often red to indicate that fire that would have burned there.  I like a good story don't you?

    Here I have layered the number two piece of the fabric on top of the first.  The next step is to flip the paper foundation back over and carefully carry it to the sewing machine without anything shifting.  Next time I will layer first and  then pin I think!

    Singer 28, Singer 28K, threaded

    My lovely 1899 Singer 28K

    This is where I start and where I finish.  I aim for about a quarter of an inch before and after the outline on the foundation.

    I then continue adding strips, pressing with a dry iron as I go, following the numbers and tonal value already printed on the paper foundation.  When finished the block looks like this:

    Nice?

    The paper foundation stays with the completed block until I am ready to set the blocks and piece them into a quilt top. At the moment each block takes about an hour to piece (including cutting time) so I suppose I am some way off that.