Wednesday 27 March 2013

The Log Cabin Quilt: Sashing and Border update

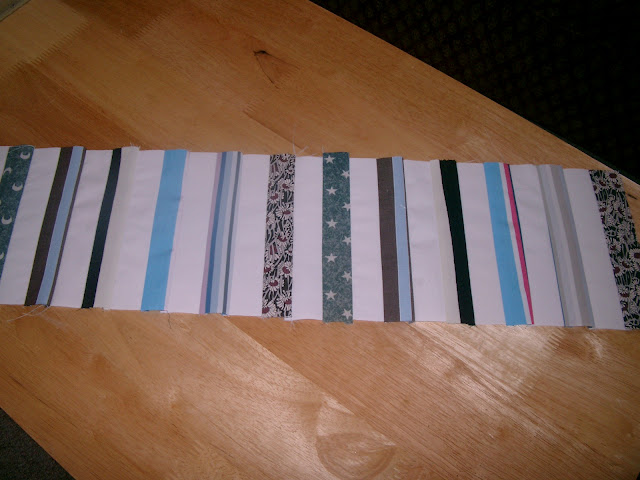
Here are the log cabin blocks pieced together in the sunshine and shadow setting. All the paper foundation has been removed [with the help of TMB - thanks!] and the narrow red sashed border added.  I think I like it... 

Spot the toe of my carpet slippers! 

Production has switched to the 201K.  The 28K's bobbin ran out on Saturday afternoon and I already had a class 66 bobbin wound with white thread.  The large level work space of the 201K's cabinet made the long seams more manageable. Does anyone else ever switch machines part way through a project?

Here is the quilt top a few minutes later with the first long side of piano keys added.  The border has been pressed and the quilt is making me smile.


Next job is to make another long piano key border for the other side but I may get distracted working out how I am going to handle the corner blocks.  I'm not sure I have the strength for mitred piano keys.

Tuesday 26 March 2013

New Shirt Pattern

Hello.  I would like to start today's post with a big thank you to Muv and Peter for posting links to my blog on theirs.  This has led to record number of page views, new followers, and some great comments.  Thanks to everyone who has stopped by and especially to those who have left comments or decided to join the blog as followers.

With all this excitement was there ever a worse time for my poor camera to die on me?  Well with me planning to show you all how the borders for the log cabin quilt are coming along with I should say NOT!  With the MOT paid for and road tax just around the corner I'm not sure when a new camera will be on the cards :0(

I think I'll have to dig out the cable and do some experiments with my phone to see if I can produce any pics to keep the blog going in the meantime.  Keep watching

In other news I now have a shirt pattern.  I've been inspired by Peter's use of this pattern


I've never made a shirt before but I think it's time to take the plunge.  Or it will be when the log cabin quilt is finished.  I like all three versions shown on the pattern envelope.  My head has been turned by view B which has tucks on the front yoke but I will try to make the short sleeved version.  I'm a bit scared, as a beginner, of cuffs and plackets.  I've got some cheap nice lightweight cotton shirting for a muslin.  Let's see how that goes.  With a bit of luck I might have a new shirt in time for my holidays!


Thursday 21 March 2013

Piano Keys Quilt Border

I have made a start.  Here is the first section of the border I am preparing for the Log Cabin Quilt (two pattern repeats so far).

Piano Keys Quilt Border for the Log Cabin Quilt


I just wanted to get a bit done as a sample.  The keys are cut at one and half by six and a half inches so finish up the same width as the strips in the log cabin blocks.  I rather like how this is turning out so far.

I am not sure how much of this I am going to need yet.  I need to park the piano keys, piece the centre section and add the narrow sashing.  I wonder if The-Much-Beloved will allow me any sewing time over the weekend.

Tuesday 19 March 2013

The Log Cabin Quilt: Progress

Here are the log cabin blocks I have made laid out on the sitting room floor.  No design wall for me.

Log cabin crib quilt

Log Cabin Blocks

Now when I started piecing these I didn't really know what I was making.  I started the green log cabins as an experiment in paper foundation piecing.  I have now made 24 log cabin blocks. That's four blocks in six different colours.  Having done this I feel that I have made as many log cabin blocks I as would like to for the time being.  I think I am tired of sewing, fabric I can't see, through a sheet of paper.

Each of my 24 blocks will finish at seven inches square so at the moment I have a potential width of 28 inches and length 42 inches.  I think I have two options.

  1. make another 24 blocks and to create a quilt top 42 x 56 inches
  2. take what I have and use borders to bring the quilt top up to a similar size
I have decided that I am going to go with the second option.  Thinking about borders and my small fabric stash some kind of pieced 'scrappy' border is going to the answer.  I used piano keys for the border on my first ever quilt and enjoyed making them and the finished look of them.

Having looked at the scraps I have available I think I am going to use the red from the middle of the log cabins to add a narrow sashing border around the outside of the 24 log cabins.  Then I am going to use strips of the printed fabric, alternating with strips of the remaining white, to make the piano key border around that.  I am hoping that the red will frame the  log cabins and that the alternate white strips will prevent the outer border from over powering the centre blocks.  We will see.

Chain Piecing with the Singer 28K - Note the seam guide set for a scant quarter inch

Here I have started chain piecing one and a half inch strips to make the border.  This is the first time I have used this technique and I like the way it seems to save time and thread.

Pressing Chain Pieced Piano Keys - please excuse my ironing board cover.

These piano keys waiting to be snipped apart and trimmed open.

Making a decision about where this quilt top is going next has reawakened my interest and excitement in this project.  I am already thinking about what style of quilting will suit this patchwork.

Monday 18 March 2013

Saturday Shopping Spree

I haven't done any sewing since Thursday but I have been planning and shopping.  Next best thing?

A few weeks ago my oldest old friend told me the fantastic news that she was expecting her first baby.  Wonderful news for her and just the excuse that I've been looking for to make a cot-sized fence rail quilt.

I had stumbled across a free pattern at Victoriana Quilt Designs a few months back and stored the idea in my memory bank for later.

I imagine something bright, fun and cute but not mawkish for a baby quilt and as we don't know what type of baby we are expecting I am steering clear of pink flowers and Disney Princesses.

I was thrilled to find these fabrics in the shop that is never knowingly undersold.  I spotted the owl print first and fell for it.  I've had a bit of a thing for Owls for ages.  I think it goes back to childhood memories of Blackberry Farm, Winnie the Pooh, The Sword in the Stone and Clash of the Titans (the original one with Larry, Maggie and Burgess).  Wise nocturnal birds seem to me to be appropriate to watch over infant sleep.


The bright yellow leaf print was next to catch my eye.  The yellow is a spot on match for the yellow on the owl print and the leaf is stylistically similar on both fabrics.  I toyed with a few options over the the third fabric.  I wanted to bring out either the red or the blue from the owl print.  I saw some blue with irregular yellow dots that I liked but the yellow wasn't quite right and then, a few bolts down the rack, I spied the petrel blue version of the yellow leaf print.  I hummed and hahhed a bit over it.  I didn't want the thing to look too leafy but The-Much-Beloved and the staff helped me make up my mind.


The pattern I intend to make calls for three fabrics; a dark tone on tone, medium tone on tone, and a light print.  I think I am near enough on that one.

I have one or two things to finish before I go at this project hammer and tongs so I guess I can enjoy the smell of new fabric for a few days more before I get down to washing and preshrinking the new yardage.

Thursday 14 March 2013

Liberty Print Boxer Shorts

After being cleaned and oiled I felt that the Singer 15K80 needed a work out so I ran these up.

Liberty Boxer Shorts

I picked the liberty print up at Fabric Galore in Battersea  months ago.  I had pre-washed, ironed and put it into the stash ages ago.  I had even been so organised as to buy thread and elastic at the same time.

The pattern I used is fairly simple.  It uses only two pattern pieces or rather the same pattern piece cut, flipped over and cut again.  I managed to cut out and nearly finish the boxers last night and hemmed them while the dinner was cooking this evening.  I have made this pattern once before (it was my first project when I started sewing after being given the 28K) so I had a fair idea of what I was doing.

From winding the bobbin with brownish red thread to finishing the hem the 'fifteen' performed faultlessly.  The old machine seemed to run more smoothly and more quietly with every stitch and it feels like it has some serious piercing power.  This fabric is probably 'dress weight' and as such maybe a shade heavy for boxers but two layers of it were as nothing to the 'fifteen'.  There is one point in this project where I was sewing through (I think) nine layers of cotton (it can happen) and the machine never missed a beat.

 As written the pattern suggests a zigzag and trim seam finish and even zigzagging the hem.  That isn't possible on a straight stitch machine so I did some thinking and adapted it for flat felled seams.  Neat and tidy for the inside of undies!

Flat Felled Seam

The elastic is encased in a tunnel waistband and the fly went together without too much bother.  It's not quite ready to wear but I am happy with the result and I'm sure it will be fairly robust.

Fly and Waistband inside view

At one and a quarter inches the hem is much deeper than any of my shop bought boxers but they hang well and both legs are the same length!


And I've now got plenty of scraps to turn into log cabin blocks!

Liberty Scraps


Tuesday 12 March 2013

Long Bobbins New vs Old

The shuttle and bobbin that came with my Singer 28K

My experience - When my Singer 28K arrived I was relieved, after the cursory research I had carried out by that time, to discover that it came with one bullet-shaped shuttle (shiny and free of rust) and one bobbin (wound with oil-soaked thread).  I became quite excited when I found that new bobbins to fit Singers 27,127, 28 and 128 were offered for sale cheaply all over the Internet and thought a good starter would be to get hold of five so that I could sew with more than one colour.


Original bobbin (top) and shorter modern replacement (below) 

When they arrived I found that they are a few millimetres shorter than the bobbin that came with the machine and that the tips were a good deal less pointy.  The upshot of this was that the bobbin winder on my 28K really didn't get on well with them.  The blunt ends don't sit well in the winder and tend to slip. As they are on the short side the arm of the thread guide travels past the end of the bobbins taking the thread with it and causing a tangle.


Note that the thread guide travels past the end of reproduction bobbins


More Internet based research threw up a couple of workarounds.  The first is to bypass the thread guide and use your finger and thumb the second is to build up one end of the bobbin with blue tack.  I am not keen on either but by using the former I managed to get one of the new (short) bobbins loaded with thread.  If you can get this far then you will find that the thing fits inside the shuttle and the machine will sew happily without further incident.

A little while later I saw some more new bobbins advertised as being longer than most available and to fit Singer 27/127 and 28/128.  I thought I would try them.  This next batch are longer than the first ones I bought but they are still a shade shorter than the original part.  They sit better and do not seem prone to slippage.  Again if you can get them filled (I simply stop when the thread guide gets to the left hand end of the bobbin, lift the thread out, wind the bobbin past the high spot on the heart shaped cam, put the thread back in guide and continue repeating the step as many times as required) they fit inside the shuttle and the machine will sew well.

During the last couple of weeks I have been lucky enough get hold of some old [original?] long bobbins.  I have two basic patterns.  The first looks a lot like the one that came with my machine some have a hole in one end and others dont.  The second are domed, rather than pointed, at one end.  Being second hand bobbins each one came prewound with several colours of old cotton and silk thread.  The thread had attracted moisture which has caused light surface rust on the spool of the bobbins but this can be smoothed off with metal polish and the brass ends shine up a treat!  Best of all, as they are original parts, they have a great original fit in the bobbin winder.  This really does speed things up.

Original bobbins pointed without holes (left), domed with hole (centre) pointed with hole (right)


My advice - Go to the effort of sourcing some original old style bobbins they will make using a VS sewing machine a much more pleasant experience.  From what I can gather most Singer Vibrating Shuttle machines were supplied with a bobbin and four spares when new.  Millions of VS machines were manufactured so there must be tens of millions of old long bobbins kicking around the world even to this day!  I bet most of them are in the drawers of treadle bases or old tobacco and shortbread tins.

My question - Who is making these other bobbins and why, if one is going to go to the trouble of manufacturing obsolete parts, don't they make them to the right spec?