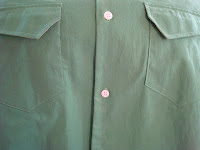
It's buttonhole time for the Negroni shirt. I had a grim determination to finish the project on the 201K and I've never used the buttonholer on that machine so I decided it was time to give it a try. The first thing to do was take the straight stitch presser foot off the machine.
Here is the 201K with the presser foot removed. There's something really strange about seeing a familiar object with one tiny detail changed - a bit like seeing the cleanly shaven face of a usually bearded friend?
Interestingly the instructions of the buttonholer are to always use the cover plate and never to drop the feed dogs. I cannot imagine why this would be but I am a great one for doing as I'm told so here we are. I make sure the needle passes through the slot in the cover plate and screw it down securely.
The two red plastic thumbscrews on the right of the machine allow one to adjust the "BIGHT" and "WIDTH". The flat head adjustment screw for the stitch density is hidden in the triangular window in the body of the attachment.
Meanwhile, over on the other side of the attachment, the other small thumbscrew adjusts the length of the buttonhole. In a middle position like this one the buttonhole comes out at about half an inch. The larger screw advances the buttonholer through the perimeter of the buttonhole.
I made lots of sample buttonholes and even tried out the bar tack feature the attachment offers (centre top). I had to play around a lot it's all fun trial and error stuff. I found the belt of the machine slips a bit with the buttonholer adding extra drag so I may shorten it.
My finished button holes look okay and they work. We'll see how they hold up to wear.


There are numerous adjustments on your buttonholer. Quite a challenge to be adjusted properly I'm sure. My buttonholers only have a width adjustment. I like the contrast of white buttons to the green cloth. On a different subject: I get a kick out of "Keeping up Appearances". Do you watch it?
ReplyDeleteI must have seen all of the episodes at some point or another. Great, slightly surreal show.
DeleteGreat job on the shirt! I recently acquired a 1947 201k and love it! And Hyacinth is awesome! ;)
ReplyDeleteGlad to hear you enjoy your 201K. The actress who played Hyacinth is a wonderful woman. Look up Miss Fozzard Finds her feet or a lady of letters
DeleteG
x
I'm not sure I've ever seen buttonhole stitches like the ones pictured. Neat.
ReplyDeleteHi Gavin, The buttonholer can be a pig to set up. You are not alone on that one. Just when you think you have got it spot on it sometimes just goes off and does its own thing. When it does work very cleaver. Great shirt. Regards Duncan
ReplyDeleteLove the shirt and have enjoyed the blog posts on its construction. Thanks for the shot of the 201 and the advice to use the coverplate instead of dropping the feed dogs on that model. I keep intending to try a vintage attachment on the vintage machines but keep procrastinating. I use a mechanical bernina for all my buttonholes and if it ever dies I am in trouble as I have not fully bonded with the buttonholes on the computerized models here.
ReplyDeleteThat looks a lot different from the buttonhole attachment I used to have. Mine had little plastic "templates" to make exact sizes of buttonholes. Unfortunately, it only came with the least common buttonhole sizes. It finally broke, I spent months unsuccessfully searching for another one (this was before the Internet) panicked for a while, considered getting a new sewing machine just to do buttonholes, and finally learned how to make buttonholes by hand. Now, I wouldn't do them any other way even if I could. :-)
ReplyDelete